DHT11 Temperature and Humidity Monitoring System with OLED Display – A Complete Guide
Introduction
In this comprehensive guide, we will walk you through the step-by-step process of building a temperature and humidity monitoring system using the DHT11 sensor and a 128×64 OLED display. This project is beginner-friendly and provides a solid foundation for those who want to explore the world of sensors, microcontrollers, and real-time data visualization.
Whether you’re a hobbyist, student, or aspiring developer, this project will introduce you to the basics of sensor interfacing, data processing, and displaying real-time sensor readings on an OLED screen. By the end of this tutorial, you’ll have a fully functional system capable of accurately measuring and displaying environmental conditions, while also gaining valuable experience in Arduino programming, circuit wiring, and library integration.
How the System Works
This temperature and humidity monitoring system works as follows:
- The DHT11 sensor continuously measures the surrounding temperature and humidity.
- The Arduino board reads the sensor data and processes it.
- The processed temperature and humidity values are displayed on the OLED screen in real-time.
- The system updates data periodically, ensuring accurate and up-to-date readings.
This simple yet effective setup helps in monitoring environmental conditions, making it useful for weather stations, indoor climate control, and IoT-based projects.
Project Overview
This exciting project involves reading temperature data (both in Celsius and Fahrenheit) and humidity levels from the DHT11 sensor and visually displaying this information on a 128×64 OLED screen. The combination of sensor data and graphical display makes it an excellent learning opportunity for those new to microcontroller programming. With the DHT11 providing reliable environmental readings and the OLED ensuring clear, concise data representation, this project serves as a fantastic introduction to sensor-based data visualization. Whether you want to use it as a standalone weather monitoring system or integrate it into more complex applications, this project provides a solid foundation for understanding and working with sensor data.
Components Needed
- DHT11 Sensor – For measuring temperature and humidity.
- OLED Display (128×64) – For displaying the data.
- Arduino Board – Any Arduino board like Uno, Nano, or Mega will work.
- Connecting Wires – For connections between components.
- Breadboard – For easy connections (optional).
Required Libraries
You will need the following libraries installed in the Arduino IDE:
- DHT Sensor Library – For interfacing with the DHT11 sensor.
- Adafruit GFX Library – For graphics rendering.
- Adafruit SSD1306 Library – For controlling the OLED display.
Library Installation Steps:
- Open the Arduino IDE.
- Go to Sketch > Include Library > Manage Libraries.
- In the Library Manager, search for the following libraries and click “Install”:
- DHT Sensor Library (by Adafruit)
- Adafruit GFX Library
- Adafruit SSD1306
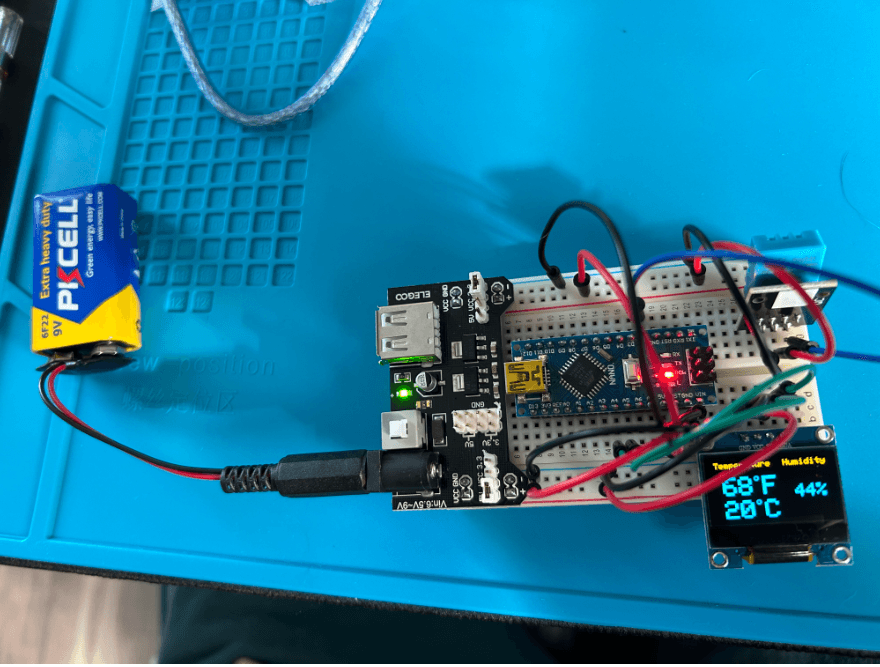
Wiring Diagram
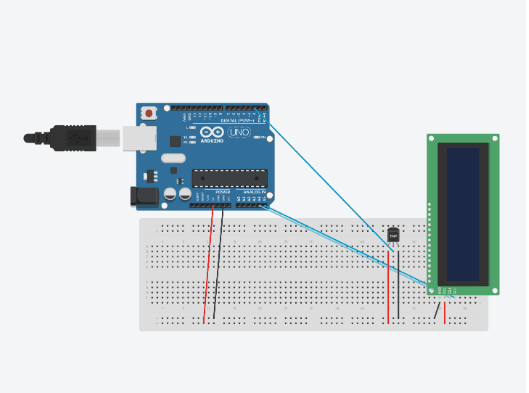
Below are the connections for this project:
DHT11 Sensor:
- VCC to 5V on Arduino.
- GND to GND on Arduino.
- DATA to Pin 2 on Arduino.
OLED Display:
- SDA to A4 (on Arduino Uno) or the dedicated SDA pin.
- SCL to A5 (on Arduino Uno) or the dedicated SCL pin.
- VCC to 5V on Arduino.
- GND to GND on Arduino.
Full Code
//DHT sensor
#include "DHT.h"
#define DHT11Pin 2
#define DHTType DHT11
//OLED
#include  <Wire.h>
#include <Adafruit_GFX.h>
#include <Adafruit_SSD1306.h>

DHT  HT(DHT11Pin,DHTType);
float humi;
float tempC;
float tempF;

//OLED  define
#define SCREEN_WIDTH 128 //OLED display width, in pixels
#define SCREEN_HEIGHT  64 //OLED display height, in pixels
//SSD1306 display connected  to I2C (SDA, SCL pins)
Adafruit_SSD1306 display(SCREEN_WIDTH, SCREEN_HEIGHT,  &Wire, -1);

void setup() {
  Serial.begin(9600);
  //For DHT11
  HT.begin();
  //Necessary code for OLED I2C
  if(!display.begin(SSD1306_SWITCHCAPVCC, 0x3C))  { // Address 0x3D for 128x64
    Serial.println(F("SSD1306 allocation failed"));
    for(;;);
  }
  display.display(); //Displays the starting logo
  delay(1000);
  display.clearDisplay();
}

void loop() {
 delay(1000);
 humi =  HT.readHumidity();
 tempC = HT.readTemperature();
 tempF = HT.readTemperature(true);

 display.clearDisplay();
  oledDisplayHeader();
 //configures the position of the readings. (charactersize, x axis value, y axis value, reading, symbol)
oledDisplay(2,90,28,humi,"%");
 oledDisplay(3,-10,44,tempC,"C");
  oledDisplay(3,-10,16,tempF,"F");

 display.display();

}

void  oledDisplayHeader(){
  //configures position and qualities of headers
 display.setTextSize(1);
 display.setTextColor(WHITE);
  display.setCursor(0, 0);
 display.print("Temperature");
 display.setCursor(80,  0);
 display.print("Humidity");
}
void oledDisplay(int size, int x,int  y, float value, String unit){
 int charLen=18;
 int xo=x+charLen*3.2;
  int xunit=x+charLen*3.6;
 int xval = x;
 display.setTextSize(size);
 display.setTextColor(WHITE);

 if (unit=="%"){
   display.setCursor(x, y);
   display.print(value,0);
   display.print(unit);
 } else {
   if (value>99){
    xval=x;
   }  else {
    xval=x+charLen;
   }
   display.setCursor(xval, y);
   display.print(value,0);
   display.drawCircle(xo, y+2, 2, WHITE);  // print degree symbols
   display.setCursor(xunit,  y);
   display.print(unit);
 }

}
Code Explanation
The provided code reads temperature and humidity data from the DHT11 sensor and displays it on the OLED. The OLED screen header and readings are displayed in a neat, user-friendly format.
Key Functions in the Code:
- oledDisplayHeader()
- Displays the header text (“Temperature” and “Humidity”).
- oledDisplay()
- Custom function to display values with their respective units (e.g., °C, %, °F).
- HT.readTemperature() and HT.readHumidity()
- Reads the temperature and humidity values from the DHT11 sensor.
Applications
- Weather Monitoring: Measure and display real-time weather conditions.
- Greenhouses: Monitor temperature and humidity for optimal plant growth.
- Home Automation: Integrate with smart home systems for environmental monitoring.
Conclusion
This project demonstrates how to collect and display sensor data efficiently. By combining the DHT11 sensor with an OLED display, you can create a compact and visually appealing monitoring system. Experiment with this setup, and feel free to expand its functionality further by adding features like data logging or Wi-Fi connectivity!


1 thought on “DHT11 Temperature and Humidity Monitoring with OLED Display”