Setting Up a Robot Car with an Ultrasonic Sensor and Servo Motor for Obstacle Avoidance
Requirements:
- Arduino Board (e.g., Uno)
- Adafruit Motor Shield (AFMotor library)
- Servo Motor (for rotating ultrasonic sensor)
- Ultrasonic Sensor (e.g., HC-SR04)
- 4 DC Motors (for robot movement)
- Jumper Wires and Battery Pack (to power motors and Arduino)
- Arduino IDE (Installed on your computer)
Step-by-Step Guide:
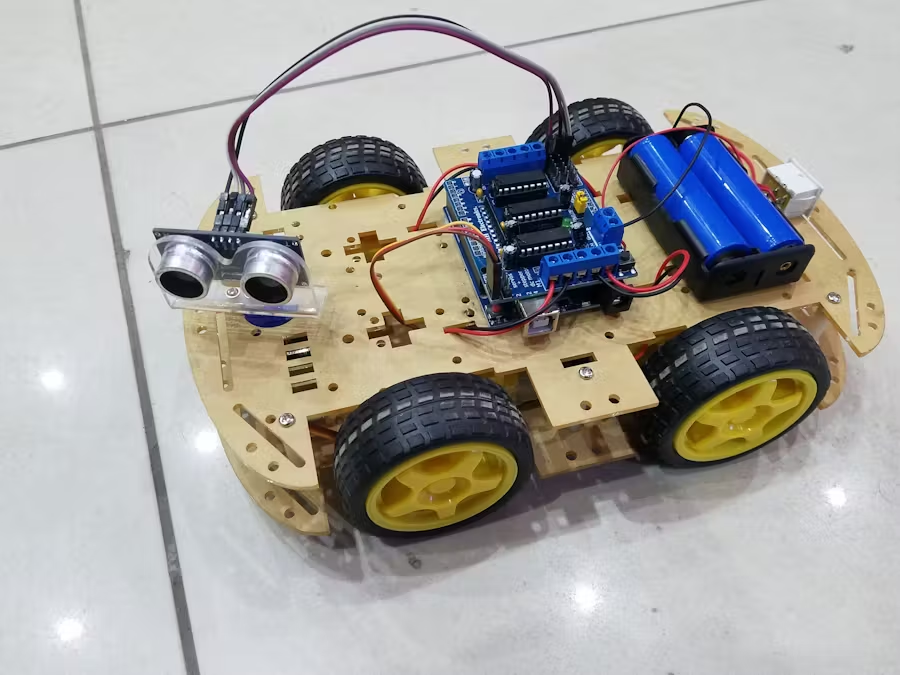
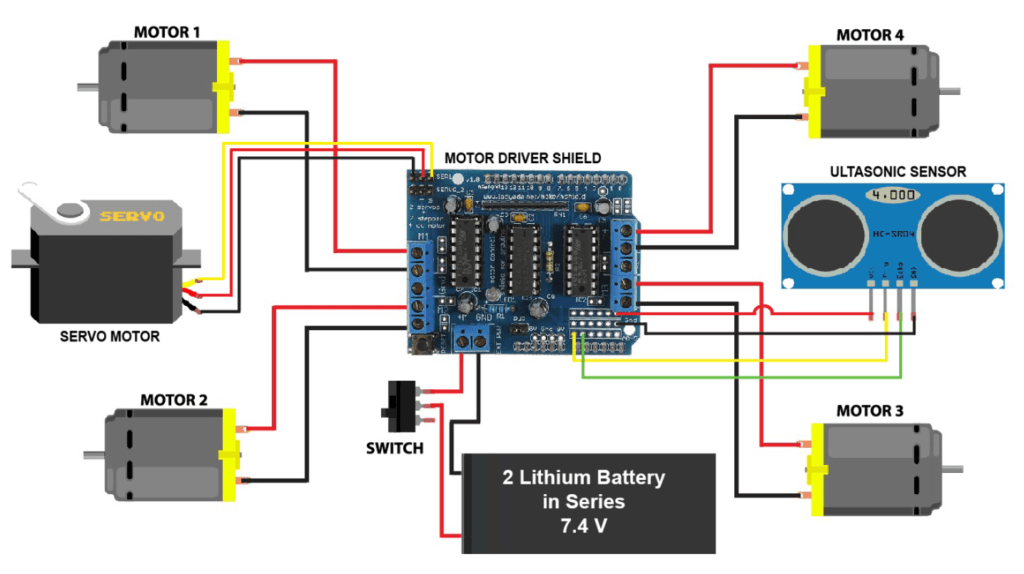
Step 1: Assemble the Hardware
- Attach the Motor Shield to the Arduino board by aligning and pressing it down onto the pins.
- Connect the DC Motors to the motor shield:
- Connect the front-left motor to M1.
- Connect the back-left motor to M2.
- Connect the front-right motor to M3.
- Connect the back-right motor to M4.
- Mount the Ultrasonic Sensor on the Servo:
- Fix the ultrasonic sensor to the servo motor so it can rotate left and right.
- Secure both to the front of the car.
- Connect the Servo Motor to Pin 10 on the motor shield.
- Wire the Ultrasonic Sensor:
- Connect trigPin to A0 on the motor shield.
- Connect echoPin to A1 on the motor shield.
Step 2: Upload the Code to Arduino
- Open the Arduino IDE on your computer.
- Install necessary libraries if not already installed:
- Go to Sketch > Include Library > Manage Libraries…
- Search for AFMotor and install it.
- Search for Servo if it’s not already included.
- Copy and paste the code into the Arduino IDE.
- Connect the Arduino to your computer via USB.
- Select the correct Board and Port in the Tools menu.
- Click Upload to upload the code to the Arduino.
Step 3: Download and Add Arduino Libraries
1 . Download the Library Files:
- Go to the download section on this website and download the AFMotor.zip and Servo.zip library files.
- Save the downloaded files in a folder of your choice.
2. Add the Libraries in Arduino IDE:
- Open the Arduino IDE.
- Go to Sketch > Include Library > Add .ZIP Library… in the top menu.
- Select the downloaded library files (AFMotor.zip and Servo.zip) and click Open.
- Arduino IDE will confirm if the libraries are successfully added.
3. Confirm Library Installation:
- In your code, add
#include <AFMotor.h>and#include <Servo.h>at the beginning. - Upload the code to Arduino. If no error appears, the libraries are installed correctly.
Step 3: Power Up the Car
Once the code is uploaded, disconnect the USB cable.Power the car using a battery pack. Ensure the motor shield can handle the voltage of your battery.The car should now be ready to move and avoid obstacles.
Digaram
Cod
#include <AFMotor.h>
#include <Servo.h>

Servo servo;

AF_DCMotor LF(1);
AF_DCMotor LB(2);
AF_DCMotor RF(3);
AF_DCMotor RB(4);

#define trigPin  A0
#define echoPin  A1

void setup() {
    servo.attach(10);  // Attach the servo
    pinMode(trigPin, OUTPUT);  // Declare "trigPin" as "Output Pin".
    pinMode(echoPin, INPUT);   // Declare "echoPin" as "Input Pin".
    Serial.begin(9600);        // Start serial communication
}

void loop() {
    float distance = search();  // Measure distance
    Serial.print("Distance = ");
    Serial.println(distance);

    // Adjust to avoid zero distance readings
    if (distance > 0) {
        if (distance <= 25) {
            RobotStop();
            delay(200);

            if (distance <= 30) {  // If obstacle found within 30 cm
                RobotStop();  // Robot stops
                delay(500);
                servo.write(5);  // Move servo to 5 degrees
                delay(500);

                float RightDistance = search();  // Measure right distance
                delay(100);
                servo.write(180);  // Move servo to 180 degrees
                delay(500);

                float LeftDistance = search();  // Measure left distance
                delay(100);
                servo.write(90);  // Reset servo to center position
                delay(300);

                // Decide which direction to turn based on distances
                if (LeftDistance > RightDistance) {
                    Motor_Speed(140);
                    RobotBackward();
                    delay(300);
                    RobotStop();
                    delay(100);
                    RobotLeft();
                    delay(500);
                    RobotStop();
                    delay(100);
                } else {
                    Motor_Speed(140);
                    RobotBackward();
                    delay(300);
                    RobotStop();
                    delay(100);
                    RobotRight();
                    delay(500);
                    RobotStop();
                    delay(100);
                }
            }
        } else if (distance <= 60) {
            Motor_Speed(170);
            RobotForward();
        } else {
            Motor_Speed(200);
            RobotForward();
        }
    } else {
        Serial.println("Invalid reading");
        RobotStop(); // Stop the robot if distance is invalid
    }

    delay(100);  // Add a small delay before the next loop iteration
}

float search() {
    float duration = 0.00;
    float CM = 0.00;

    digitalWrite(trigPin, LOW);
    delayMicroseconds(2);
    digitalWrite(trigPin, HIGH);
    delayMicroseconds(10);
    digitalWrite(trigPin, LOW);

    duration = pulseIn(echoPin, HIGH, 30000); // Timeout after 30ms
    CM = (duration / 58.82);  // Convert time to distance in cm

    // Return 0 if distance is invalid
    if (CM > 0 && CM < 400) {  // Range check
        return CM;
    } else {
        return 0;  // Invalid distance reading
    }
}

void RobotForward() {
    LF.run(FORWARD);
    RF.run(FORWARD);
    LB.run(FORWARD);
    RB.run(FORWARD);
}

void RobotBackward() {
    LF.run(BACKWARD);
    LB.run(BACKWARD);
    RF.run(BACKWARD);
    RB.run(BACKWARD);
}

void RobotLeft() {
    LF.run(BACKWARD);
    LB.run(BACKWARD);
    RF.run(FORWARD);
    RB.run(FORWARD);
}

void RobotRight() {
    LF.run(FORWARD);
    LB.run(FORWARD);
    RF.run(BACKWARD);
    RB.run(BACKWARD);
}

void RobotStop() {
    LF.run(RELEASE);
    LB.run(RELEASE);
    RF.run(RELEASE);
    RB.run(RELEASE);
}

void Motor_Speed(int mtrspd) {
    LF.setSpeed(mtrspd);
    LB.setSpeed(mtrspd);
    RF.setSpeed(mtrspd);
    RB.setSpeed(mtrspd);
}
Hope You’ve Successfully Built Your Obstacle-Avoiding Robot Car!
If you follow all the steps carefully, I am confident that your obstacle-avoiding robot car will navigate around obstacles successfully. This project is an excellent choice for beginners, providing a hands-on introduction to robotics. Not only will it enhance your understanding of how an obstacle-avoiding robot car operates, but it will also give you practical experience in assembling and programming a functional robot. Dive in and watch your creation come to life!


