Infrared Remote-Controlled Light: A Comprehensive Project Guide
Introduction
With the advancement of technology, we can develop systems that make our daily tasks easier and more efficient. In this project, we will learn how to use an infrared (IR) remote and Arduino to control LEDs. Additionally, we will discuss how to enhance this basic project by adding a relay module, enabling us to control AC voltage devices.
This project is ideal for beginners looking to learn about IR remote systems and for advanced users who want to explore the foundation of home automation systems.
Components Required
For this project, you will need the following components:
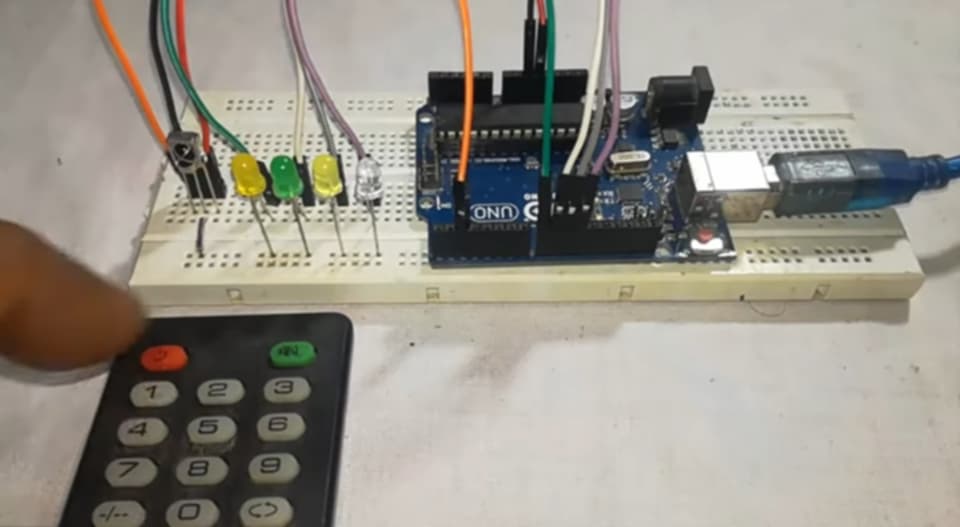
- Arduino UNO R3: Acts as the microcontroller.
- IR Receiver Module: Receives infrared signals from the remote.
- IR Remote: Sends infrared signals to control devices.
- LEDs (3): Used to visualize the system’s working.
- Resistors (330Ω): Protect the LEDs from excess current.
- Relay Module (5V): To control AC devices (optional but highly recommended for advanced features).
- Breadboard and Jumper Wires: For easy and temporary connections.
- USB Cable: To connect the Arduino to your computer for programming and power.
Time Required to Complete
The basic project can be completed within 1-2 hours. If you include the relay module and set up an AC load, it might take an additional 1 hour, depending on your experience level.
Enhancing the Project: Adding a Relay Module
What is a Relay Module, and Why Use It?
A relay module is an electrically operated switch that allows you to control high-voltage devices using low-voltage signals. Adding a relay module to this project enables you to control AC-powered devices such as lights, fans, or appliances.
Steps to Connect a Relay Module:
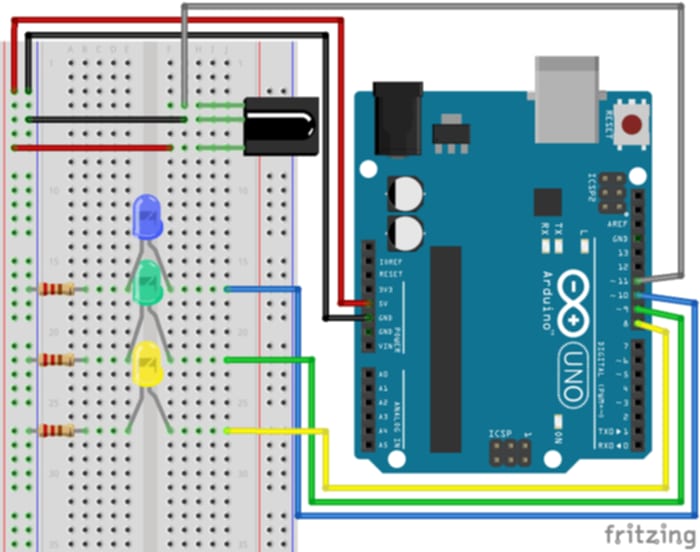
- Relay Module to Arduino Connections:
- Connect the VCC pin of the relay module to the Arduino’s 5V pin.
- Connect the GND pin of the relay module to the Arduino’s GND.
- Connect the IN pin of the relay module to any digital pin on the Arduino (e.g., pin 7).
- AC Load Connection:
- Connect one wire of your AC load (e.g., a bulb) to the Normally Open (NO) terminal of the relay.
- Connect the other wire of the AC load to the Common (COM) terminal of the relay.
- Ensure the second wire of the load is connected to the neutral AC line.
Daigram
Codes
1. IR Receiver Code
This code is used to read and display the HEX value of the buttons pressed on the IR remote.
#include <IRremote.h>

int RECV_PIN = 11; // Pin connected to IR Receiver
IRrecv irrecv(RECV_PIN); // Create an IRrecv object
decode_results results; // To store decoded results

void setup() {
  Serial.begin(9600);       // Initialize serial communication
  irrecv.enableIRIn();      // Start the IR receiver
}

void loop() {
  if (irrecv.decode(&results)) {           // Check if a signal is received
    Serial.println(results.value, HEX);   // Print the HEX code to the serial monitor
    irrecv.resume();                      // Ready to receive the next signal
  }
  delay(100);
}
Explanation of Receiver Code:
#include <IRremote.h>: The IRremote library is included to handle IR communication.int RECV_PIN = 2;: Defines pin 2 for the IR receiver connection.irrecv.decode(&results): Checks if the IR receiver detects a signal and stores it inresults.results.value: Retrieves the HEX value of the button pressed on the IR remote.Serial.println(results.value, HEX);: Displays the HEX value in the serial monitor.
This code is essential to identify the HEX codes corresponding to the remote buttons, which you will use in the control code.
2. IR Control Code
This code toggles LEDs ON and OFF based on the buttons pressed on the IR remote.
#include <IRremote.h>

int RECV_PIN = 11; // Pin connected to IR Receiver
IRrecv irrecv(RECV_PIN); // Create an IRrecv object
decode_results results; // To store decoded results

int led1 = 8, led2 = 9, led3 = 10; // Pins for LEDs
int state1 = 1, state2 = 1, state3 = 1; // LED states

void setup() {
  Serial.begin(9600);
  irrecv.enableIRIn();      // Start the IR receiver

  // Set LED pins as outputs
  pinMode(led1, OUTPUT);
  pinMode(led2, OUTPUT);
  pinMode(led3, OUTPUT);
}

void loop() {
  if (irrecv.decode(&results)) {
    Serial.println(results.value, HEX);
    irrecv.resume();

    // Check for specific HEX codes and toggle LEDs
    if (results.value == 0x24DB8877) {
      digitalWrite(led1, state1);
      state1 = !state1; // Toggle state
    } else if (results.value == 0x24DB48B7) {
      digitalWrite(led2, state2);
      state2 = !state2;
    } else if (results.value == 0x24DBC837) {
      digitalWrite(led3, state3);
      state3 = !state3;
    }
  }
}
Explanation of Control Code:
- LED Pins: Pins 8, 9, and 10 are used to control LEDs.
- LED States: Variables
state1,state2, andstate3track the ON/OFF states of each LED. - Conditionals for HEX Codes: Checks if the received HEX code matches specific buttons on the remote (e.g.,
0x24DB8877toggles LED 1). state1 = !state1;: Toggles the LED state between ON and OFF.
Note on Adding Remote Hex Codes to the Project
When you create this project, you need to add the specific HEX codes for the buttons on your IR remote control. These codes are unique for each remote and correspond to different buttons on the remote.
Where to Add the Hex Codes
In the Control Code, you will find conditions checking for certain HEX codes to control the LEDs or relay. For example:
if (results.value == 0x24DB8877) {
  // This is the code for the first button
  digitalWrite(led1, state1);
  state1 = !state1; // Toggle the LED state
}
Here, 0x24DB8877 is the HEX code of a button on the IR remote. You need to:
- Run the Receiver Code first to identify the HEX codes of the buttons on your remote.
- Open the Serial Monitor and press the buttons on the remote. The corresponding HEX codes will appear in the monitor.
- Copy the HEX codes of the buttons you want to use (for example, turning on/off specific devices or LEDs).
- Replace the existing HEX codes in the Control Code with the ones you copied from the Serial Monitor.
Steps to Add the HEX Codes:
- Identify the button you want to control using the IR remote.
- Press the button and note the HEX code displayed in the Serial Monitor.
- In the Control Code, locate the lines like
if (results.value == 0x24DB8877)and replace0x24DB8877with the HEX code of the button you want to use. - Upload the code to your Arduino, and now you can control the corresponding devices with the remote.
Download Library Files
To get started with this project, you will need to download the necessary library files and the code.
Library Files
- IRremote Library:
Download the IRremote library from the Arduino Library Manager. To install it:- Open the Arduino IDE
- Go to Sketch > Include Library > Manage Libraries
- Search for IRremote and click Install.
This process ensures that your project is customized to your specific IR remote, allowing you to control various devices based on the remote buttons you choose.
Practical Applications of the Project
- Home Automation:
Control AC-powered lights, fans, or other appliances with ease using this project. - Education and Learning:
This project serves as an excellent introduction to IR communication, automation, and Arduino programming. - Robotics:
The system can be adapted for robotic applications requiring remote control. - Remote Access:
Ideal for operating devices in hard-to-reach areas or for individuals with mobility challenges.
Importance in Everyday Life
- Enhanced Convenience:
Operating devices remotely is easier and more efficient. - Energy Efficiency:
Remote control ensures devices are turned off when not in use, saving energy. - Accessibility:
This project is especially beneficial for differently-abled individuals, providing them with a convenient way to operate devices.
Future Improvements
You can enhance this project with the following features:
- Bluetooth or Wi-Fi Integration:
Replace the IR remote with a smartphone app for controlling devices. - Voice Command Features:
Integrate with voice assistants like Google Assistant or Alexa. - Internet of Things (IoT):
Allow remote control from anywhere in the world through an internet connection. - Multi-Device Control:
Expand the system to control multiple devices using a single remote or app. - Safety Enhancements:
Add overload protection or fail-safes to ensure safe operation of high-voltage devices.
Conclusion
This infrared remote-controlled system is not only an educational project but also a practical solution to everyday challenges. By adding a relay module, it becomes a versatile tool capable of controlling both low-voltage and high-voltage devices.
The project serves as a stepping stone toward building advanced home automation systems. Whether you are a beginner or an experienced hobbyist, this system provides valuable insights into IR communication, automation, and Arduino programming.
Start with this basic project, and explore its endless possibilities to make life more convenient and efficient.


