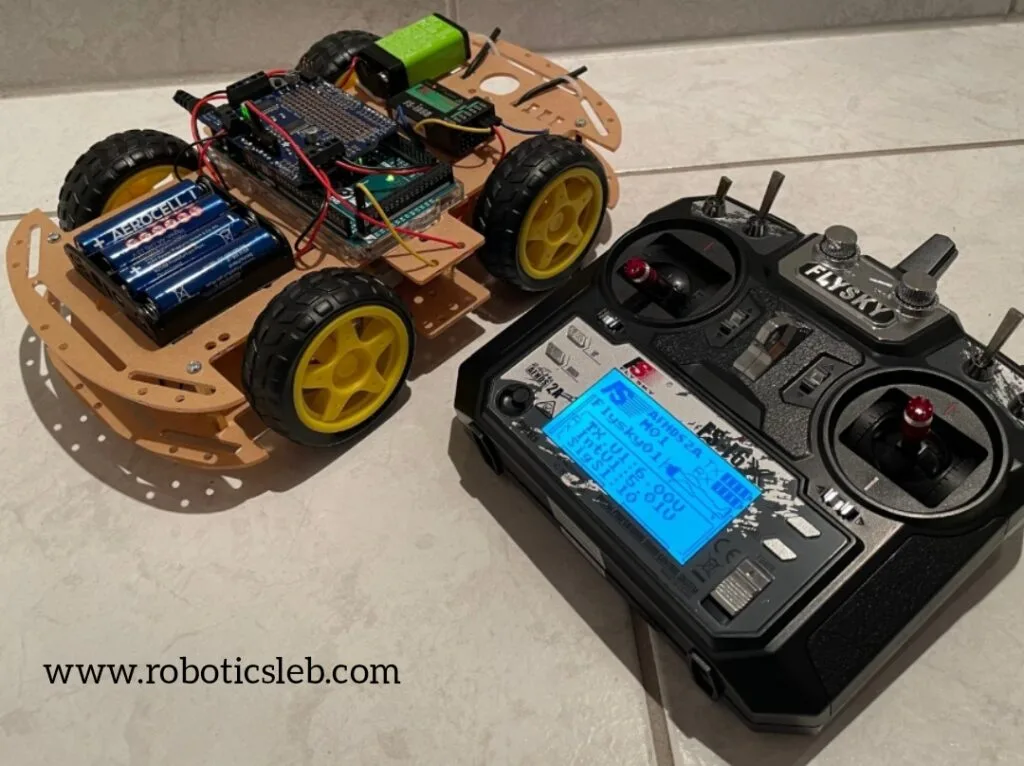
Components Required:
1. Arduino Mega 2560
2. Adafruit Motor Shield v2.3
3. FlySky FS-i6X Transmitter and FS-iA6B Receiver
4. 4 DC Motors with wheels
5. Power Supply (Battery pack or LiPo battery)
6. Chassis for car assembly
7. Bluetooth module (optional)
8. Wires and connectors
9. Screwdriver and soldering iron (optional)
Step 1: Set Up the Motors and Chassis
Mount the 4 DC motors onto the chassis of the car. The motors should be attached to the wheels.
Ensure the motor positioning is correct:
Two motors on the left side (Motor1 and Motor2).
Two motors on the right side (Motor3 and Motor4).
Step 2: Connect the Adafruit Motor Shield v2.3
Stack the Adafruit Motor Shield on top of the Arduino Mega. The shield will use the I2C communication pins to control the motors.
Connect the motors to the motor shield:
Motor1 → M1 (Motor 1 output on the shield)
Motor2 → M2
Motor3 → M3
Motor4 → M4
Make sure the polarity is correct. If the motor spins in the wrong direction, you can swap the wires or adjust the code later.
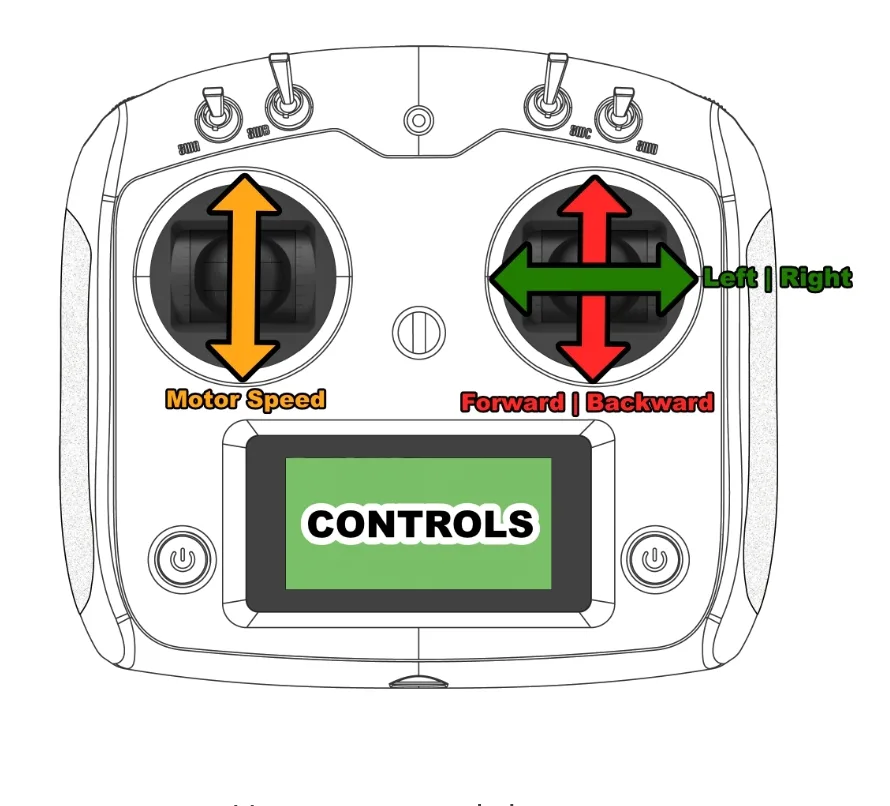
Step 3: Connect the FlySky Receiver to Arduino
Power the FlySky receiver using a 5V connection from the Arduino Mega.
Connect the signal channels from the receiver to the Arduino Mega:
Use Serial1 (RX1 and TX1) to communicate with the FlySky FS-i6X receiver.
Channel 1 → For throttle (acceleration).
Channel 2 → For steering (left-right movement).
Channel 3 → Forward and backward direction.
Step 4: Powering the Setup
Connect an external power source (battery pack) to the motor shield. The power should be sufficient to run all four motors.
Ensure the voltage and current are within the motor and shield’s operational range.
Power the Arduino Mega either using the same battery pack (via VIN pin) or through USB for programming.
Step 5: Load and Modify the Code
Upload the provided code to your Arduino Mega using the Arduino IDE.
Check the following in the code:
Motor control functions are defined for all four motors (mControl1 to mControl4).
Channels are read using the FlySky receiver (readChannel() function).
Speed and direction are calculated based on the joystick input from the FlySky transmitter.
You can modify the channel mappings depending on how your transmitter is configured.
Step 6: Test and Calibrate the Car
Test the car controls:
Acceleration: Pushing the joystick forward will increase speed.
Steering: Moving the joystick left or right will turn the car.
Forward/Backward: Another joystick axis can control the direction.
If the car doesn’t move as expected:
Check the wiring and ensure the motors are connected to the correct terminals.
Fine-tune the channel values in the code if necessary by adjusting the range in the readChannel() function.
Step 7: Final Adjustments
Make sure the car operates smoothly:
Check the turning radius and speed limits.
You can add Bluetooth control later if you want to switch between radio and Bluetooth.


// Include Libraries
#include <Wire.h>
#include <Adafruit_MotorShield.h>
#include "utility/Adafruit_MS_PWMServoDriver.h"
#include <IBusBM.h>

// Initialize Motors
Adafruit_MotorShield AFMS = Adafruit_MotorShield();
Adafruit_DCMotor *motor1 = AFMS.getMotor(1);
Adafruit_DCMotor *motor2 = AFMS.getMotor(2);
Adafruit_DCMotor *motor3 = AFMS.getMotor(3);
Adafruit_DCMotor *motor4 = AFMS.getMotor(4);

// Create iBus Object and Channel Values
IBusBM ibus;
int rcCH1 = 0;  // Acceleration
int rcCH2 = 0;  // Left - Right
int rcCH3 = 0;  // Forward - Backward

// Motor Speed Variables
int motor1speed = 0;
int motor2speed = 0;
int motor3speed = 0;
int motor4speed = 0;

// Motor Direction Variables
int motor1dir = 0;
int motor2dir = 0;
int motor3dir = 0;
int motor4dir = 0;

// Function to Read the Channel Values
int readChannel(byte channelInput, int minLimit, int maxLimit, int defaultValue) {
  uint16_t ch = ibus.readChannel(channelInput);
  if (ch < 100) return defaultValue;
  return map(ch, 1000, 2000, minLimit, maxLimit);
}

// Functions to Control Each Motor
void mControl1(int mspeed, int mdir) {
  motor1->setSpeed(mspeed);
  if (mdir == 1) {
    motor1->run(FORWARD);
  } else {
    motor1->run(BACKWARD);
  }
}

void mControl2(int mspeed, int mdir) {
  motor2->setSpeed(mspeed);
  if (mdir == 1) {
    motor2->run(FORWARD);
  } else {
    motor2->run(BACKWARD);
  }
}

void mControl3(int mspeed, int mdir) {
  motor3->setSpeed(mspeed);
  if (mdir == 1) {
    motor3->run(FORWARD);
  } else {
    motor3->run(BACKWARD);
  }
}

void mControl4(int mspeed, int mdir) {
  motor4->setSpeed(mspeed);
  if (mdir == 1) {
    motor4->run(FORWARD);
  } else {
    motor4->run(BACKWARD);
  }
}

void setup() {
  // Initialize Motor Shield and iBus
  AFMS.begin();
  ibus.begin(Serial1);
  delay(2000);
}

void loop() {
  // Get Channel Values
  rcCH1 = readChannel(0, -100, 100, 0);
  rcCH2 = readChannel(1, -100, 100, 0);
  rcCH3 = readChannel(2, 0, 155, 0);

  // Set Motor Speeds based on Channel 3
  motor1speed = rcCH3;
  motor2speed = rcCH3;
  motor3speed = rcCH3;
  motor4speed = rcCH3;

  // Forward and Backward with Channel 2
  if (rcCH2 >= 0) {
    motor1dir = 1;
    motor2dir = 1;
    motor3dir = 1;
    motor4dir = 1;
  } else {
    motor1dir = -1;
    motor2dir = -1;
    motor3dir = -1;
    motor4dir = -1;
  }

  // Add Channel 2 Speed for Forward/Backward Movement
  motor1speed += abs(rcCH2);
  motor2speed += abs(rcCH2);
  motor3speed += abs(rcCH2);
  motor4speed += abs(rcCH2);

  // Left/Right Offset with Channel 1
  motor1speed += rcCH1;
  motor2speed += rcCH1;
  motor3speed -= rcCH1;
  motor4speed -= rcCH1;

  // Constrain Motor Speeds between 0 and 255
  motor1speed = constrain(motor1speed, 0, 255);
  motor2speed = constrain(motor2speed, 0, 255);
  motor3speed = constrain(motor3speed, 0, 255);
  motor4speed = constrain(motor4speed, 0, 255);

  // Drive Motors
  mControl1(motor1speed, motor1dir);
  mControl2(motor2speed, motor2dir);
  mControl3(motor3speed, motor3dir);
  mControl4(motor4speed, motor4dir);

  // Small delay
  delay(50);
}


What phrase… super
In it something is. Earlier I thought differently, I thank for the help in this question.
-ogdvkvc cjtj? Tri kjfgkfi kgifkg djgc7rkvgifv
Good