HM10 Bluetooth-Controlled Robot Car with Arduino and Dabble Gamepad
In this tutorial, you’ll learn how to set up and control a Bluetooth-controlled robot car using an Arduino, an HM-10 Bluetooth module, and a motor driver module. We’ll be using the Dabble app as a gamepad to control the movement of the robot.
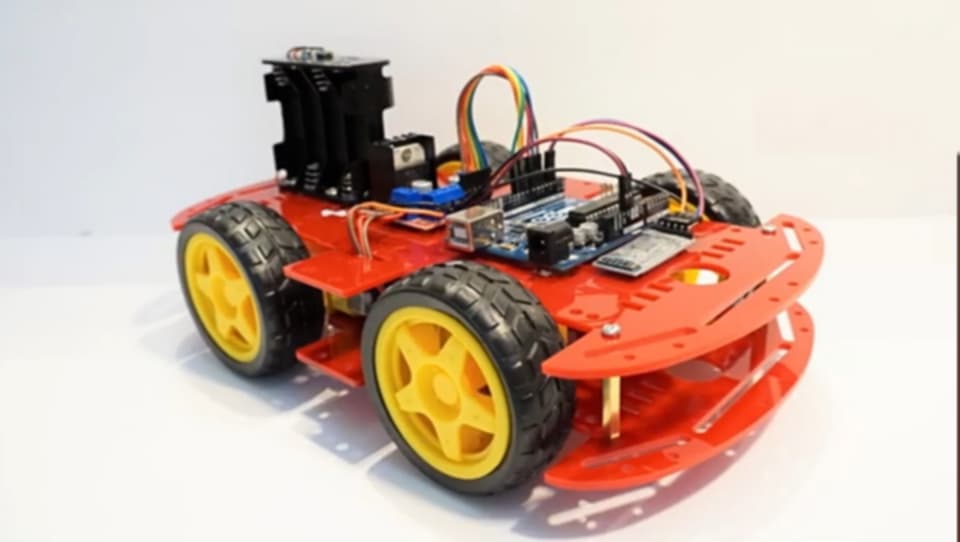
Components Needed
- Arduino Uno
- HM-10 Bluetooth module
- L298N Motor Driver Module
- Four DC Motors
- 7-12V DC power supply
- Jumper wires
- Dabble app (Download link below)
Step 1: Connect the Hardware Components
Add the wiring diagram here to help users follow the connections clearly.
- Connect the Motors to the Motor Driver Module (L298N)
- Right Motor 1 to OUT1 and OUT2 on the motor driver.
- Right Motor 2 to OUT3 and OUT4 on the motor driver.
- Left Motor 1 to OUT1 and OUT2 on the motor driver.
- Left Motor 2 to OUT3 and OUT4 on the motor driver.
- Connect the Motor Driver to Arduino
- Connect
IN1on the motor driver to Arduino pin 7. - Connect
IN2on the motor driver to Arduino pin 8. - Connect
IN3on the motor driver to Arduino pin 9. - Connect
IN4on the motor driver to Arduino pin 10. - Connect the
EN1pin of the motor driver to Arduino pin 5. - Connect the
EN2pin of the motor driver to Arduino pin 6.
- Connect
- Power Connections
- Connect the 7-12V DC power supply to the motor driver’s
VCCandGNDterminals. - Connect the motor driver’s
GNDto the Arduino’sGNDfor a common ground connection. - Connect the Arduino to your computer using a USB cable to upload the code.
- Connect the 7-12V DC power supply to the motor driver’s
- Connect the Bluetooth Module (HM-10)
- Connect the
TXpin of the HM-10 to Arduino’s digital pin 2. - Connect the
RXpin of the HM-10 to Arduino’s digital pin 3. - Connect
VCCandGNDof the HM-10 to the Arduino’s5VandGNDpins, respectively.
- Connect the
Daigram

Step 2: Upload the Code
Use the following code to program your Arduino:
#define CUSTOM_SETTINGS
#define INCLUDE_GAMEPAD_MODULE
#include <Dabble.h>

// Right motor pins
int enableRightMotor = 5;
int rightMotorPin1 = 7;
int rightMotorPin2 = 8;

// Left motor pins
int enableLeftMotor = 6;
int leftMotorPin1 = 9;
int leftMotorPin2 = 10;

void setup() {
  pinMode(enableRightMotor, OUTPUT);
  pinMode(rightMotorPin1, OUTPUT);
  pinMode(rightMotorPin2, OUTPUT);

  pinMode(enableLeftMotor, OUTPUT);
  pinMode(leftMotorPin1, OUTPUT);
  pinMode(leftMotorPin2, OUTPUT);

  rotateMotor(0, 0);
  Dabble.begin(9600, 2, 3);  // Initialize Bluetooth communication
}

void loop() {
  int rightMotorSpeed = 0;
  int leftMotorSpeed = 0;

  Dabble.processInput();

  if (GamePad.isUpPressed()) {
    rightMotorSpeed = 255;
    leftMotorSpeed = 255;
  }

  if (GamePad.isDownPressed()) {
    rightMotorSpeed = -255;
    leftMotorSpeed = -255;
  }

  if (GamePad.isLeftPressed()) {
    rightMotorSpeed = 255;
    leftMotorSpeed = 0;
  }

  if (GamePad.isRightPressed()) {
    rightMotorSpeed = 0;
    leftMotorSpeed = 255;
  }

  rotateMotor(rightMotorSpeed, leftMotorSpeed);
}

void rotateMotor(int rightMotorSpeed, int leftMotorSpeed) {
  if (rightMotorSpeed < 0) {
    digitalWrite(rightMotorPin1, LOW);
    digitalWrite(rightMotorPin2, HIGH);
  } else {
    digitalWrite(rightMotorPin1, HIGH);
    digitalWrite(rightMotorPin2, LOW);
  }

  if (leftMotorSpeed < 0) {
    digitalWrite(leftMotorPin1, LOW);
    digitalWrite(leftMotorPin2, HIGH);
  } else {
    digitalWrite(leftMotorPin1, HIGH);
    digitalWrite(leftMotorPin2, LOW);
  }

  analogWrite(enableRightMotor, abs(rightMotorSpeed));
  analogWrite(enableLeftMotor, abs(leftMotorSpeed));
}
- Open the Arduino IDE, paste the code, and upload it to the Arduino.
- Ensure the baud rate is set to 9600 for proper communication with the Bluetooth module.
Step 3: Set Up the Dabble App
- Download and Install Dabble
Install the Dabble app on your smartphone from this link: Download Dabble App. - Pair the Bluetooth Module
- Open the Dabble app on your phone.
- Go to Settings in the app and turn on Bluetooth if it’s off.
- Search for available devices, select your HM-10 module, and pair it with the phone.
- Control the Robot with the Gamepad
- In the Dabble app, go to Gamepad.
- Use the directional buttons to control the robot’s movement:
- Up for forward
- Down for backward
- Left for left turn
- Right for right turn
Troubleshooting Tips
- Motor Not Running: Check the power connections and ensure your battery provides enough voltage.
- Bluetooth Not Connecting: Confirm the HM-10 module is powered and the TX/RX pins are correctly connected.
- Response Delay: If the robot’s response is slow, ensure that the Dabble app’s baud rate matches the code (9600).


Me puede compartir la aplicación para el celular por fa
Hi JULI Please tell me in English and I will try to answer your question.