
Understanding the HC-06 and HC-05 Bluetooth Modules
The HC-06 and HC-05 are Bluetooth modules widely used in microcontroller projects for enabling wireless communication between devices. These modules are particularly popular in Arduino-based projects due to their simplicity and effectiveness. They allow serial communication over Bluetooth, making them ideal for projects ranging from home automation to robotics. While both modules serve similar purposes, they differ significantly in functionality, configuration, and applications. Below, we’ll dive deep into their features, differences, and step-by-step setup with Arduino Uno.
HC-05 Bluetooth Module
Functionality
The HC-05 module operates as both a Master and Slave device. This means it can initiate communication with other Bluetooth devices (Master mode) or respond to commands from a Master device (Slave mode). This dual functionality makes it versatile and suitable for various applications.
Applications
The HC-05 is perfect for projects that require bidirectional communication. Examples include:
- Smartphone-controlled robots
- Wireless data transfer between devices
- Device-to-device communication setups
Configuration
The HC-05 can be configured into either Master or Slave mode using AT commands. It comes with a default baud rate of 9600, which can be adjusted based on project requirements. The extensive configurability of the HC-05 makes it adaptable to complex setups.
Compatibility
The HC-05 works seamlessly with popular microcontrollers such as:
- Arduino (all models)
- ESP32
- Raspberry Pi
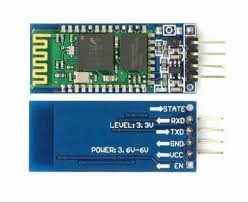
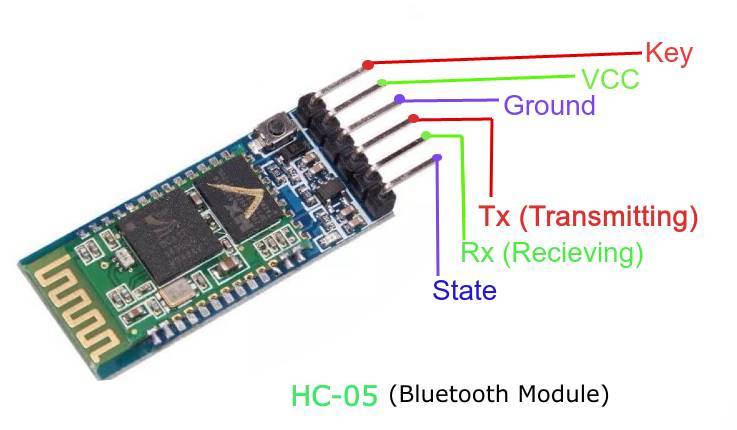
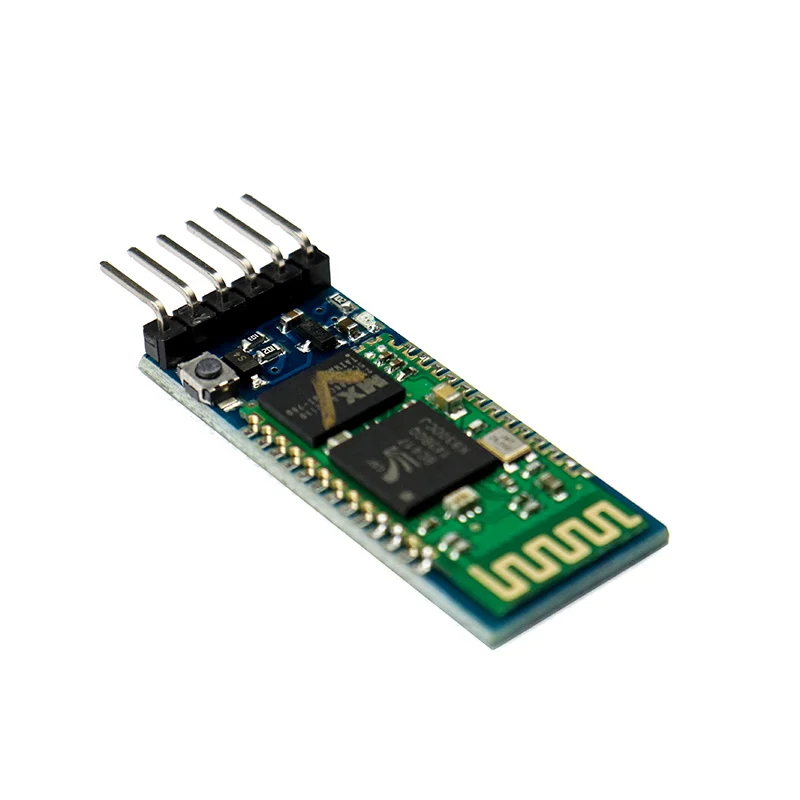
HC-06 Bluetooth Module
Functionality
Unlike the HC-05, the HC-06 operates solely as a Slave device. It can only respond to requests from a paired Master device, making it less flexible but easier to use.
Applications
The HC-06 is ideal for simple, straightforward projects where the module only needs to receive commands. Examples include:
- Turning on a light or motor via a smartphone
- Basic wireless data logging
Configuration
The HC-06 has limited configuration options compared to the HC-05. Its default baud rate is 9600 and cannot be changed. However, this simplicity makes it beginner-friendly.
Compatibility
The HC-06 is compatible with:
- Arduino microcontrollers
- Other basic microcontroller setups
Key Differences between HC-05 and HC-06
| Feature | HC-05 | HC-06 |
|---|---|---|
| Operating Mode | Master and Slave | Slave only |
| Configuration Options | Extensive (via AT commands) | Limited |
| Applications | Versatile, multi-device communication | Simple, master-controlled projects |
| Default Baud Rate | 9600 (adjustable) | 9600 (fixed) |
Setting Up HC-05 or HC-06 with Arduino Uno
Both modules can be connected to an Arduino Uno in a similar manner. The steps below outline the hardware and software setup process.
Required Components
- Arduino Uno
- HC-05 or HC-06 Bluetooth Module
- Jumper Wires
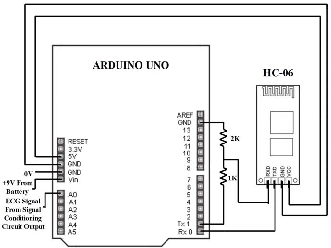
Wiring Diagram
| Bluetooth Module Pin | Arduino Pin |
| VCC | 5V |
| GND | GND |
| TXD | RX (Pin 0) with a voltage divider |
| RXD | TX (Pin 1) |
Note: The RX pin on the Bluetooth module operates at 3.3V. To prevent damage, use a voltage divider between the Arduino’s TX (5V) and the module’s RX.
Arduino Code Example
The following code tests the Bluetooth connection by reading and printing data received via Bluetooth:
void setup() {
  Serial.begin(9600); // Initialize serial communication
}

void loop() {
  if (Serial.available()) {
    char data = Serial.read();  // Read incoming Bluetooth data
    Serial.print("Received: ");
    Serial.println(data);       // Display data in Serial Monitor
  }
}
Upload Instructions
- Disconnect the RX (Pin 0) and TX (Pin 1) wires from the Bluetooth module.
- Upload the code to the Arduino Uno.
- Reconnect the Bluetooth module after the upload completes.
Testing the Connection
- Pair your smartphone with the Bluetooth module.
- Use a Bluetooth terminal app to send commands.
- Check the Serial Monitor in the Arduino IDE for received data.
Default Pairing PIN: Typically 1234 or 0000.
Configuring HC-05 with AT Commands
Entering AT Command Mode
- Connect the EN pin on the HC-05 to 3.3V.
- Open the Serial Monitor in the Arduino IDE.
- Type AT commands to configure the module.
Common AT Commands
AT– Test communication (responds with OK)AT+ROLE=1– Set to Master modeAT+ROLE=0– Set to Slave modeAT+UART=9600,1,0– Set baud rate to 9600
Tips for Choosing the Right Module
- Use HC-05 for complex setups requiring bidirectional communication or Master functionality.
- Use HC-06 for simple projects where the module acts only as a receiver.
- Ensure proper wiring and voltage levels to avoid damaging components.


Wow