Complete Guide to Building a Project with Arduino and Neo 6M GPS Module
Introduction
The Neo 6M GPS Module is a highly efficient and reliable GPS receiver that serves as a valuable tool for obtaining location data in real-time. It offers precise geographical information such as latitude, longitude, altitude, speed, and time synchronization. This makes it an essential component for a wide range of projects, including navigation systems, real-time tracking, and outdoor robotics.
The Neo 6M GPS module is known for its compact size, low power consumption, and ease of integration with microcontrollers like the Arduino. By using this GPS module, developers can add advanced location-based functionalities to their projects, enabling real-world applications such as drone navigation, autonomous vehicles, and geofencing systems.
In this guide, we will walk you through the steps to set up the Neo 6M GPS module with Arduino. The process includes wiring the hardware, installing necessary libraries, uploading code, and viewing GPS data. Whether you are a beginner or an experienced developer, this guide will help you successfully build your GPS-based project with ease.
Why Choose the Neo 6M GPS Module?
The Neo 6M GPS module stands out due to its excellent features:
- High Accuracy: It provides precise positioning with minimal drift.
- Built-In EEPROM: Saves configuration data even after power loss.
- Compact Design: Fits easily into small devices and portable projects.
- Easy Integration: Compatible with Arduino and other microcontrollers.
- Wide Applications: Ideal for navigation, tracking, and timing purposes.
Required Components
- Arduino Uno
- Neo 6M GPS Module
- Jumper Wires
- USB Cable
- Arduino IDE
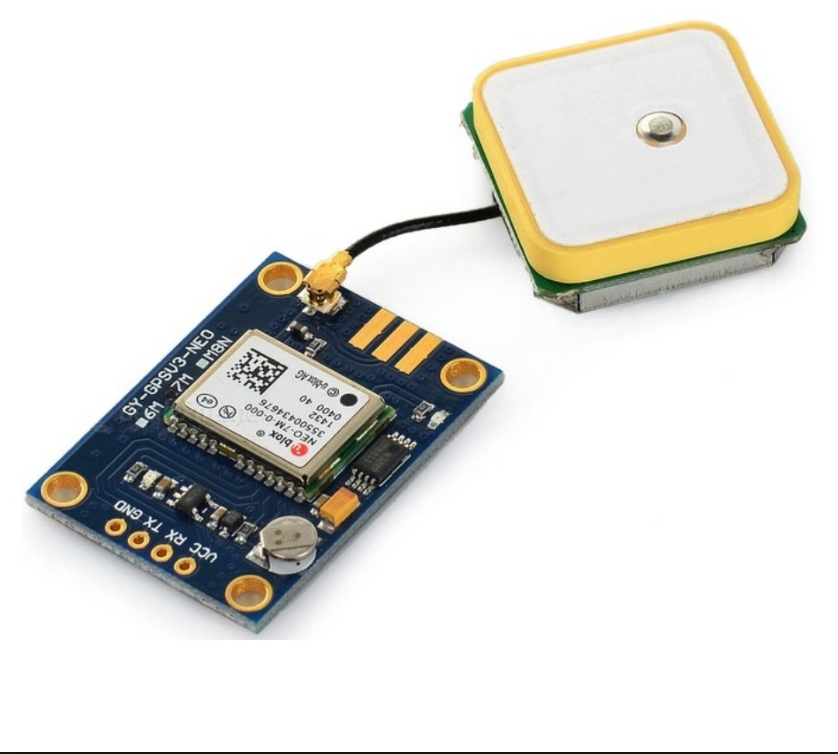
Overview of the Neo 6M GPS Module
The Neo 6M GPS module offers the following features:
- Operating Voltage: 3.3V–5V
- Baud Rate: 9600 (default)
- Data Output: NMEA Protocol
- Antenna: Built-in active antenna
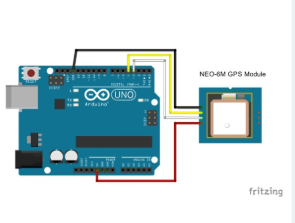
Circuit Connections
Connect the Neo 6M GPS module to the Arduino as shown in the diagram:
- GPS Module VCC → Arduino 5V
- GPS Module GND → Arduino GND
- GPS Module TX → Arduino Pin 4
- GPS Module RX → Arduino Pin 3
Full Code
#include <TinyGPS++.h>
#include <SoftwareSerial.h>

static const   int RXPin = 4, TXPin = 3;
static const uint32_t GPSBaud = 9600;

// The   TinyGPS++ object
TinyGPSPlus gps;

// The serial connection to the GPS   device
SoftwareSerial ss(RXPin, TXPin);

void setup(){
  Serial.begin(9600);
   ss.begin(GPSBaud);
}

void loop(){
  // This sketch displays information   every time a new sentence is correctly encoded.
  while (ss.available() > 0){
     gps.encode(ss.read());
    if (gps.location.isUpdated()){
      Serial.print("Latitude=   ");
      Serial.print(gps.location.lat(), 6);
      Serial.print(" Longitude=   ");
      Serial.println(gps.location.lng(), 6);
    }
  }
}
Code Explanation
The following code is designed to read GPS data.
Libraries Used:
The TinyGPS++ and SoftwareSerial libraries are used. The TinyGPS++ library is specifically designed for GPS data parsing.
#include <TinyGPS++.h>
#include <SoftwareSerial.h>
Pin Definitions and Setup:
static const int RXPin = 4, TXPin = 3;
static const uint32_t GPSBaud = 9600;
TinyGPSPlus gps;
SoftwareSerial ss(RXPin, TXPin);
Main Loop:
After encoding GPS data, it prints the latitude and longitude on the serial monitor.
if (gps.location.isUpdated()) {
    Serial.print("Latitude= ");
    Serial.print(gps.location.lat(), 6);
    Serial.print(" Longitude= ");
    Serial.println(gps.location.lng(), 6);
}
Library Installation
- Open the Arduino IDE.
- Go to
Sketch > Include Library > Manage Libraries. - Search for
TinyGPS++and install it.
Uploading the Code and Viewing Results
- Connect the Arduino to Your PC:
Use a USB cable to connect the Arduino board to your computer. Ensure the connection is secure. - Open the Arduino IDE:
Launch the Arduino IDE on your computer and create a new sketch or open an existing one. - Write or Paste the Code:
Copy the provided code for the Neo 6M GPS module and paste it into the Arduino IDE. Make sure the code is error-free and the required libraries (e.g., TinyGPS++ and SoftwareSerial) are already installed. - Select the Correct COM Port:
Navigate to Tools > Port in the Arduino IDE and select the COM port associated with your Arduino board. This ensures the IDE communicates with the correct device. - Upload the Code:
Click on the upload button in the Arduino IDE (the arrow pointing to the right). Wait for the code to compile and upload to the Arduino board. The “Done Uploading” message will confirm successful uploading. - Open the Serial Monitor:
After uploading, open the Serial Monitor in the Arduino IDE by clicking on Tools > Serial Monitor. Set the baud rate to 9600 to match the communication speed of the Neo 6M GPS module. - View GPS Data:
In the Serial Monitor, you will see the GPS data, including latitude and longitude values. These values represent your current location, provided the GPS module has acquired a signal from satellites.
Applications of the Neo 6M GPS Module
The Neo 6M GPS module is a versatile component that can be used in various projects. Here are some common applications:
- Real-Time Tracking Systems:
It can be integrated into tracking devices for vehicles, pets, or valuable items to monitor their location in real time. - Drone Navigation:
GPS modules are essential for autonomous drone navigation, enabling drones to follow preset routes or return to a specific location. - Autonomous Vehicles:
In self-driving cars or robots, GPS data helps in determining the vehicle’s position, improving navigation accuracy. - Location-Based Projects:
Create innovative projects like geofencing systems, outdoor activity trackers, or GPS-guided robots.
Conclusion
The Neo 6M GPS module, combined with an Arduino, allows for easy implementation of a wide range of location-based projects. By following this guide, you can successfully set up the module and start retrieving GPS data for your applications. Whether it’s for learning or building advanced systems, this setup serves as a robust foundation for GPS-enabled projects.


It is truly a great and useful piece of information. I¦m happy that you just shared this useful info with us. Please keep us informed like this. Thanks for sharing.