Setting Up a SIM800L GSM Module with Arduino
The SIM800L GSM module is a versatile communication module used for sending SMS, making calls, and enabling internet-based communication via GPRS. This guide explains how to connect the module to an Arduino Uno, upload the necessary code, and explore potential applications.
Required Components
To complete this project, you will need:
- Arduino Uno (or compatible board)
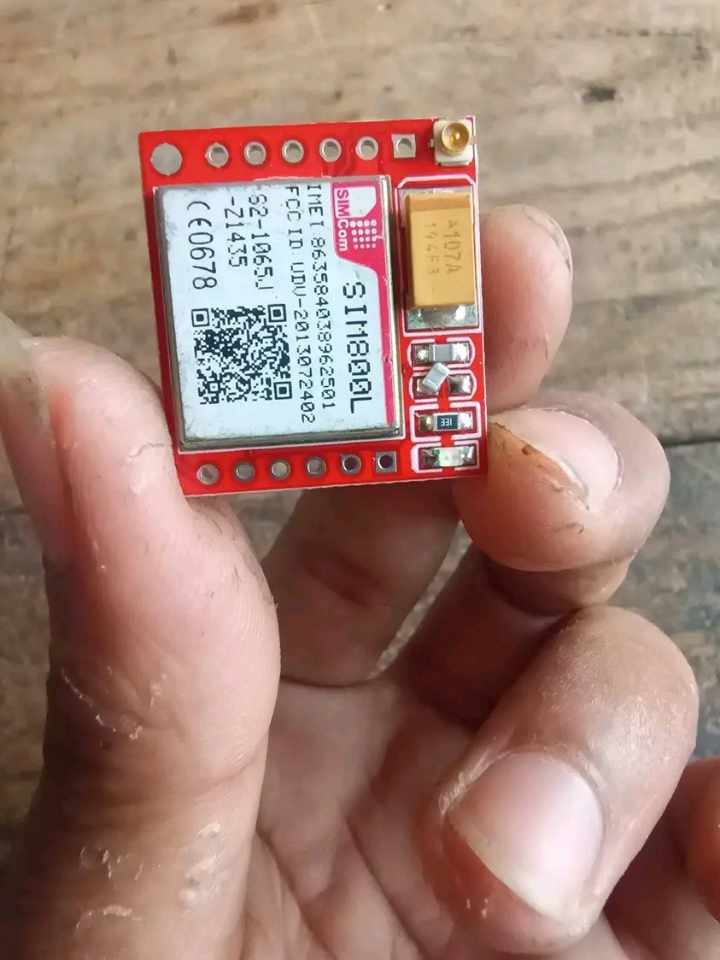
- SIM800L GSM module
- Buck converter (to step down voltage to 4V for SIM800L)
- Resistors (10kΩ and 20kΩ for voltage divider)
- SIM card (ensure it’s activated with data, call, and SMS features)
- Power source (e.g., 12V battery)
- Connecting wires
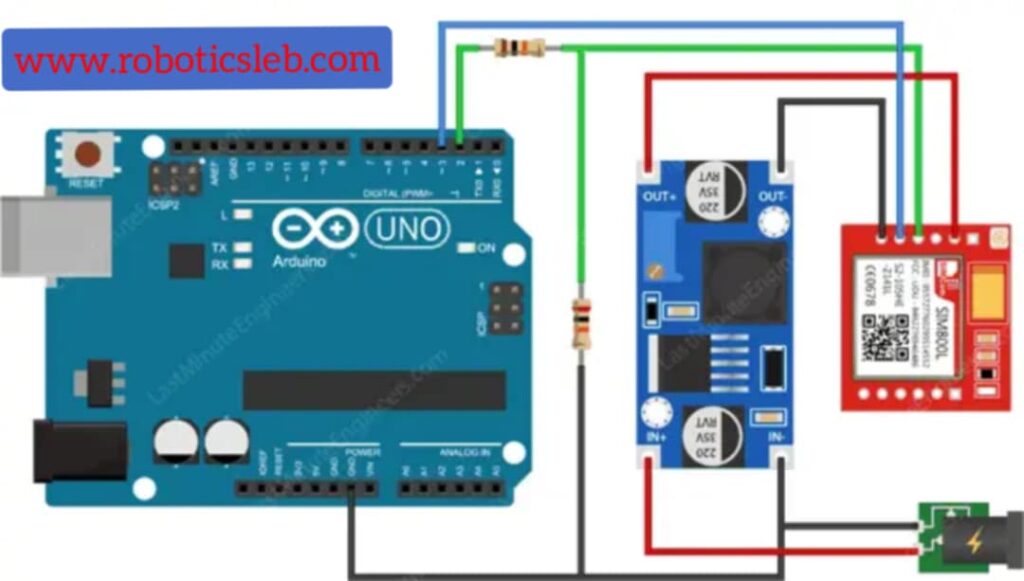
Circuit Diagram and Connection


Step 1: Powering the SIM800L Module
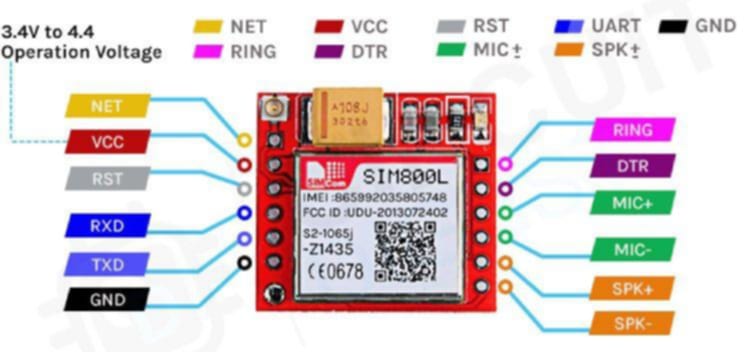
- The SIM800L module requires a stable 4V power supply, as it doesn’t tolerate higher voltages.
- Use a buck converter to step down the voltage from a 12V battery or another source.
- Connect the VCC and GND pins of the SIM800L to the buck converter’s output.
Step 2: Connecting SIM800L to Arduino
- SIM800L TX → Arduino Pin 3 via a voltage divider (using 10kΩ and 20kΩ resistors).
- This ensures the 5V signal from Arduino is stepped down to 3.3V, protecting the SIM800L.
- SIM800L RX → Arduino Pin 2.
- GND Pins: Connect the GND of the SIM800L, Arduino, and buck converter together.
Uploading the Code
Use the following code to initialize the SIM800L module and forward communication between the module and serial monitor:
#include <SoftwareSerial.h>

// Create software serial object to communicate with SIM800L
SoftwareSerial mySerial(3, 2); // SIM800L Tx & Rx is connected to Arduino #3 & #2

void setup()
{
  // Begin serial communication with Arduino IDE (Serial Monitor)
  Serial.begin(9600);

  // Begin serial communication with SIM800L
  mySerial.begin(9600);

  Serial.println("Initializing SIM800L module...");
}

void loop()
{
  updateSerial();
}

void updateSerial()
{
  delay(500);
  while (Serial.available())
  {
    mySerial.write(Serial.read()); // Forward Serial data to SIM800L
  }
  while (mySerial.available())
  {
    Serial.write(mySerial.read()); // Forward SIM800L data to Serial Monitor
  }
}
Step-by-Step Guide to Configure the SIM800L
- Prepare the Hardware:
- Ensure the SIM800L module is properly connected as per the diagram.
- Insert an active micro SIM card into the SIM800L slot.
- Power On the System:
- Power the Arduino and the SIM800L module using the buck converter.
- Upload the Code:
- Open the Arduino IDE.
- Copy and paste the above code.
- Select the correct COM port and board in the Tools menu.
- Upload the code to the Arduino board.
- Open Serial Monitor:
- Set the baud rate to 9600 and line ending to “Both NL & CR”.
- You should see a message like: “Initializing SIM800L module…”
- Send AT Commands:
Use the serial monitor to test communication. Example commands:- AT → Responds with
OK(module is working). - AT+CSQ → Displays signal strength.
- ATD+XXXXXXXXXX; → Make a call (replace
XXXXXXXXXXwith a phone number). - ATH → Hang up the call.
- AT → Responds with
Diagram
Advantages of the SIM800L Module
- Compact and Affordable: Small size and cost-effective for IoT and communication projects.
- Versatility: Supports SMS, voice calls, and GPRS for data transmission.
- Low Power Consumption: Ideal for battery-powered devices.
Applications of the SIM800L Module
- Real-World Use Cases:
- Sending SMS alerts in security systems.
- Making automated voice calls during emergencies.
- Internet-based communication for remote monitoring.
- Future Project Ideas:
- IoT Home Automation: Control appliances via SMS or calls.
- Remote GPS Tracker: Send real-time GPS data using GPRS (with a GPS module).
- Smart Weather Station: Transmit sensor data using GPRS.
- GSM-based Robot: Control robots remotely using phone signals.
- Why Choose SIM800L?
It integrates easily with microcontrollers like Arduino, has built-in error detection, and provides stable communication over 2G networks.
Additional Information
- Power Tips: Always use a stable power supply, as voltage fluctuations can damage the SIM800L.
- Network Compatibility: Ensure the module works with the local 2G network, as 3G and 4G are not supported.
- Troubleshooting:
- If the module doesn’t respond to AT commands, check the connections and ensure sufficient power.
- Use AT+IPR=9600 to set the baud rate to 9600 for stable communication.
Conclusion
The SIM800L GSM module is a powerful and affordable tool for communication-based projects. With this guide, you can set up and experiment with the module while exploring advanced applications in IoT, home automation, and robotics. By leveraging its features, you can create innovative and real-world solutions.
How Does the SIM800L Work?
The SIM800L GSM module is designed to communicate over mobile networks using the GSM (Global System for Mobile Communication) standard. Below is an explanation of how the module works step by step:
Basic Functionality of SIM800L
- Connection to Mobile Network:
The SIM800L connects to a 2G GSM network via an active SIM card. It uses AT commands (standard communication commands for GSM modules) to perform tasks like calling, sending SMS, and accessing the internet. - Communication with Microcontroller:
- The module communicates with a microcontroller (e.g., Arduino) through serial communication using TX (Transmit) and RX (Receive) pins.
- The microcontroller sends commands to the SIM800L, and the module executes them and sends back a response.
- Voice and Text Communication:
- Calling: When you send the AT command
ATD+XXXXXXXXXX;(whereXXXXXXXXXXis the phone number), the module initiates a voice call. - SMS: The AT command
AT+CMGS="XXXXXXXXXX"is used to send text messages.
- Calling: When you send the AT command
- GPRS Data Transfer:
The module supports GPRS (General Packet Radio Service) for sending and receiving data over the internet. This feature is widely used in IoT applications, such as sending sensor data to a server or receiving commands remotely.
How the Module Operates
- Power On:
- The SIM800L module requires a stable 4V DC power source. When powered on, it initializes and attempts to connect to a nearby cellular network tower.
- The Netlight LED on the module indicates the network status:
- Fast blinking: Searching for a network.
- Slow blinking: Connected to a network.
- Communication Process:
- The Arduino communicates with the module via the SoftwareSerial library.
- When the Arduino sends AT commands through the TX pin, the SIM800L executes the command and sends the response back through the RX pin.
- Signal Strength:
The AT commandAT+CSQchecks the signal strength. A response like+CSQ: 23,0indicates the signal quality (23 is a strong signal). - Making Calls and Sending SMS:
- The Arduino sends commands like
ATDfor dialing andAT+CMGSfor SMS. - The module processes these commands and communicates with the GSM network to perform the action.
- The Arduino sends commands like
- Error Detection:
The module can detect errors and send back specific error messages to the Arduino, such as “No SIM card” or “Network unavailable.”
SIM800L Use in Projects
- Remote Monitoring:
The SIM800L can send sensor data to your mobile phone via SMS or GPRS.
Example: Sending temperature readings from a sensor. - Alert Systems:
It can act as a notifier, sending SMS or calls during an emergency (e.g., fire, intrusion). - Control Systems:
The module can receive commands via SMS or calls to control devices like lights, fans, or even robots. - IoT Connectivity:
GPRS functionality allows the SIM800L to connect to online servers, enabling real-time data logging and control.
Advantages of SIM800L
- Compact Design: Easy to integrate into small projects.
- Low Power Consumption: Suitable for battery-operated devices.
- Wide Compatibility: Works with most GSM networks worldwide.
- AT Commands Support: Easy to control and program using standard commands.
This module serves as the backbone of many IoT, automation, and robotics projects, offering reliable communication with minimal hardware requirements. By using it effectively, you can create advanced systems with global connectivity.


good