Wi-Fi-Controlled Car with ESP32 CAM Car: Complete Step-by-Step Guide
Introduction
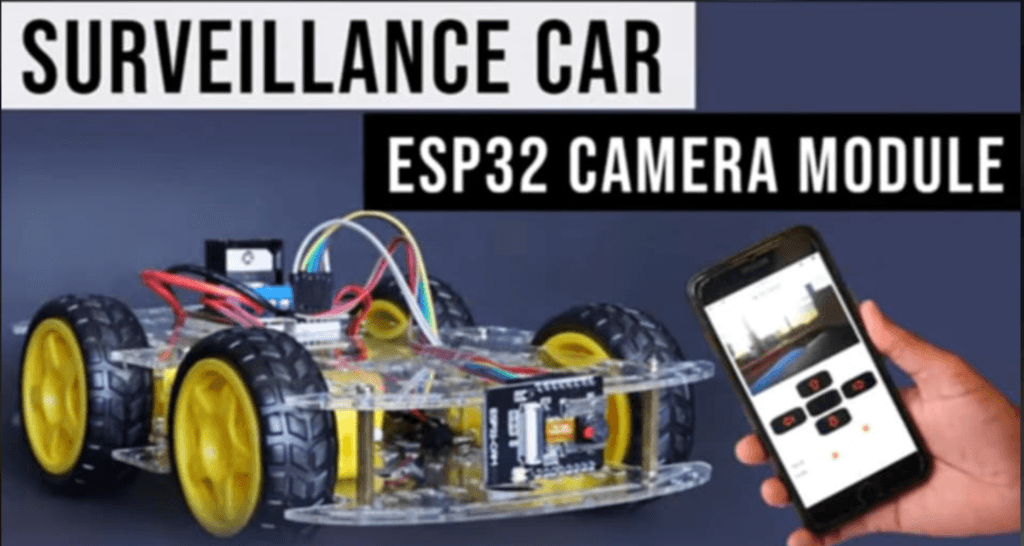
In this guide, we will explain how to build a Wi-Fi-controlled car using an ESP32 microcontroller. This project combines several exciting features, including live video streaming using an ESP32CAM Car module, servo motors for pan and tilt motion, DC motors for car movement, and LED lights for enhanced visibility. This is an excellent project for robotics enthusiasts, hobbyists, and students looking to learn about microcontrollers, IoT (Internet of Things), and robotics.
The car can be controlled remotely via a web interface through Wi-Fi, making it perfect for surveillance, fun projects, and learning the basics of embedded systems.
Project Overview
The Wi-Fi-controlled car works as follows:
- ESP32 Microcontroller: Acts as the main brain of the car, handling motor control, camera streaming, and Wi-Fi communication.
- ESP32-CAM Module: Streams live video from the car to a web interface, enabling real-time control and observation.
- Servo Motors: Allow pan and tilt motion for the camera to adjust its viewing angle.
- DC Motors with Motor Driver: Drive the car forward, backward, and allow left/right turning.
- LED Lights: Illuminate the surroundings, improving visibility during nighttime or in low-light conditions.
- Web Interface: The car can be controlled wirelessly through a browser-based control interface, which sends movement commands to the ESP32 over Wi-Fi.
Advantages of the Project
- Remote Control: Control the car easily using a smartphone, laptop, or any device with a browser and Wi-Fi connectivity.
- Live Streaming: The ESP32-CAM allows you to monitor the car’s surroundings in real-time through video streaming.
- Multi-Feature Control: Independent control of car movement, camera orientation (pan/tilt), and LED lights.
- IoT Learning: Helps you understand concepts like web server creation, motor control, and camera interfacing with ESP32.
- Customizable: You can enhance the project further with features like obstacle detection, GPS tracking, or voice commands.
Required Components
Before starting, gather the following components:
- ESP32 Development Board (NodeMCU ESP32 or similar)
- ESP32-CAM Module (for live video streaming)
- DC Motors (x2)
- L298N Motor Driver Module (to control DC motors)
- Servo Motors (x2) (for pan and tilt mechanism)
- Jumper Wires
- Breadboard
- Power Supply (Lithium-ion batteries or a power bank)
- LED Lights (Optional)
- Car Chassis Kit (with wheels and motor mount)
Wiring and Connections
ESP32 with L298N Motor Driver for DC Motors
- L298N IN1/IN2 → Connected to ESP32 GPIO pins (for motor A control)
- L298N IN3/IN4 → Connected to ESP32 GPIO pins (for motor B control)
- DC Motors → Connected to L298N Motor Outputs (OUT1, OUT2, OUT3, OUT4)
- L298N VCC → Connected to battery or power supply
- L298N GND → Common ground with ESP32
ESP32-CAM Module
- Connect ESP32-CAM to the same power supply as the ESP32 board.
- Use GPIO pins to transmit and receive camera data.
Servo Motors (Pan and Tilt)
- Servo 1 Signal Pin → ESP32 GPIO pin (e.g., GPIO 14 for pan)
- Servo 2 Signal Pin → ESP32 GPIO pin (e.g., GPIO 12 for tilt)
- VCC and GND → Connected to a 5V power supply
LED Lights
- Anode (+) → ESP32 GPIO pin
- Cathode (-) → GND
Daigram

Download COD and Daigram
#include "esp_camera.h"
#include <Arduino.h>
#include <WiFi.h>
#include <AsyncTCP.h>
#include <ESPAsyncWebServer.h>
#include <iostream>
#include <sstream>
#include <ESP32Servo.h>
#define PAN_PIN 14
#define TILT_PIN 15
Servo panServo;
Servo tiltServo;
struct MOTOR_PINS
{
int pinEn;
int pinIN1;
int pinIN2;
};
std::vector<MOTOR_PINS> motorPins =
{
{2, 12, 13}, //RIGHT_MOTOR Pins (EnA, IN1, IN2)
{2, 1, 3}, //LEFT_MOTOR Pins (EnB, IN3, IN4)
};
#define LIGHT_PIN 4
#define UP 1
#define DOWN 2
#define LEFT 3
#define RIGHT 4
#define STOP 0
#define RIGHT_MOTOR 0
#define LEFT_MOTOR 1
#define FORWARD 1
#define BACKWARD -1
const int PWMFreq = 1000; /* 1 KHz */
const int PWMResolution = 8;
const int PWMSpeedChannel = 2;
const int PWMLightChannel = 3;
//Camera related constants
#define PWDN_GPIO_NUM 32
#define RESET_GPIO_NUM -1
#define XCLK_GPIO_NUM 0
#define SIOD_GPIO_NUM 26
#define SIOC_GPIO_NUM 27
#define Y9_GPIO_NUM 35
#define Y8_GPIO_NUM 34
#define Y7_GPIO_NUM 39
#define Y6_GPIO_NUM 36
#define Y5_GPIO_NUM 21
#define Y4_GPIO_NUM 19
#define Y3_GPIO_NUM 18
#define Y2_GPIO_NUM 5
#define VSYNC_GPIO_NUM 25
#define HREF_GPIO_NUM 23
#define PCLK_GPIO_NUM 22
const char* ssid = "MyWiFiCar";
const char* password = "12345678";
AsyncWebServer server(80);
AsyncWebSocket wsCamera("/Camera");
AsyncWebSocket wsCarInput("/CarInput");
uint32_t cameraClientId = 0;
const char* htmlHomePage PROGMEM = R"HTMLHOMEPAGE(
<!DOCTYPE html>
<html>
<head>
<meta name="viewport" content="width=device-width, initial-scale=1, maximum-scale=1, user-scalable=no">
<style>
.arrows {
font-size:30px;
color:red;
}
td.button {
background-color:black;
border-radius:25%;
box-shadow: 5px 5px #888888;
}
td.button:active {
transform: translate(5px,5px);
box-shadow: none;
}
.noselect {
-webkit-touch-callout: none; /* iOS Safari */
-webkit-user-select: none; /* Safari */
-khtml-user-select: none; /* Konqueror HTML */
-moz-user-select: none; /* Firefox */
-ms-user-select: none; /* Internet Explorer/Edge */
user-select: none; /* Non-prefixed version, currently
supported by Chrome and Opera */
}
.slidecontainer {
width: 100%;
}
.slider {
-webkit-appearance: none;
width: 100%;
height: 15px;
border-radius: 5px;
background: #d3d3d3;
outline: none;
opacity: 0.7;
-webkit-transition: .2s;
transition: opacity .2s;
}
.slider:hover {
opacity: 1;
}
.slider::-webkit-slider-thumb {
-webkit-appearance: none;
appearance: none;
width: 25px;
height: 25px;
border-radius: 50%;
background: red;
cursor: pointer;
}
.slider::-moz-range-thumb {
width: 25px;
height: 25px;
border-radius: 50%;
background: red;
cursor: pointer;
}
</style>
</head>
<body class="noselect" align="center" style="background-color:white">
<table id="mainTable" style="width:400px;margin:auto;table-layout:fixed" CELLSPACING=10>
<tr>
<img id="cameraImage" src="" style="width:400px;height:250px"></td>
</tr>
<tr>
<td></td>
<td class="button" ontouchstart='sendButtonInput("MoveCar","1")' ontouchend='sendButtonInput("MoveCar","0")'><span class="arrows" >⇧</span></td>
<td></td>
</tr>
<tr>
<td class="button" ontouchstart='sendButtonInput("MoveCar","3")' ontouchend='sendButtonInput("MoveCar","0")'><span class="arrows" >⇦</span></td>
<td class="button"></td>
<td class="button" ontouchstart='sendButtonInput("MoveCar","4")' ontouchend='sendButtonInput("MoveCar","0")'><span class="arrows" >⇨</span></td>
</tr>
<tr>
<td></td>
<td class="button" ontouchstart='sendButtonInput("MoveCar","2")' ontouchend='sendButtonInput("MoveCar","0")'><span class="arrows" >⇩</span></td>
<td></td>
</tr>
<tr/><tr/>
<tr>
<td style="text-align:left"><b>Speed:</b></td>
<td colspan=2>
<div class="slidecontainer">
<input type="range" min="0" max="255" value="150" class="slider" id="Speed" oninput='sendButtonInput("Speed",value)'>
</div>
</td>
</tr>
<tr>
<td style="text-align:left"><b>Light:</b></td>
<td colspan=2>
<div class="slidecontainer">
<input type="range" min="0" max="255" value="0" class="slider" id="Light" oninput='sendButtonInput("Light",value)'>
</div>
</td>
</tr>
<tr>
<td style="text-align:left"><b>Pan:</b></td>
<td colspan=2>
<div class="slidecontainer">
<input type="range" min="0" max="180" value="90" class="slider" id="Pan" oninput='sendButtonInput("Pan",value)'>
</div>
</td>
</tr>
<tr>
<td style="text-align:left"><b>Tilt:</b></td>
<td colspan=2>
<div class="slidecontainer">
<input type="range" min="0" max="180" value="90" class="slider" id="Tilt" oninput='sendButtonInput("Tilt",value)'>
</div>
</td>
</tr>
</table>
<script>
var webSocketCameraUrl = "ws:\/\/" + window.location.hostname + "/Camera";
var webSocketCarInputUrl = "ws:\/\/" + window.location.hostname + "/CarInput";
var websocketCamera;
var websocketCarInput;
function initCameraWebSocket()
{
websocketCamera = new WebSocket(webSocketCameraUrl);
websocketCamera.binaryType = 'blob';
websocketCamera.onopen = function(event){};
websocketCamera.onclose = function(event){setTimeout(initCameraWebSocket, 2000);};
websocketCamera.onmessage = function(event)
{
var imageId = document.getElementById("cameraImage");
imageId.src = URL.createObjectURL(event.data);
};
}
function initCarInputWebSocket()
{
websocketCarInput = new WebSocket(webSocketCarInputUrl);
websocketCarInput.onopen = function(event)
{
sendButtonInput("Speed", document.getElementById("Speed").value);
sendButtonInput("Light", document.getElementById("Light").value);
sendButtonInput("Pan", document.getElementById("Pan").value);
sendButtonInput("Tilt", document.getElementById("Tilt").value);
};
websocketCarInput.onclose = function(event){setTimeout(initCarInputWebSocket, 2000);};
websocketCarInput.onmessage = function(event){};
}
function initWebSocket()
{
initCameraWebSocket ();
initCarInputWebSocket();
}
function sendButtonInput(key, value)
{
var data = key + "," + value;
websocketCarInput.send(data);
}
window.onload = initWebSocket;
document.getElementById("mainTable").addEventListener("touchend", function(event){
event.preventDefault()
});
</script>
</body>
</html>
)HTMLHOMEPAGE";
void rotateMotor(int motorNumber, int motorDirection)
{
if (motorDirection == FORWARD)
{
digitalWrite(motorPins[motorNumber].pinIN1, HIGH);
digitalWrite(motorPins[motorNumber].pinIN2, LOW);
}
else if (motorDirection == BACKWARD)
{
digitalWrite(motorPins[motorNumber].pinIN1, LOW);
digitalWrite(motorPins[motorNumber].pinIN2, HIGH);
}
else
{
digitalWrite(motorPins[motorNumber].pinIN1, LOW);
digitalWrite(motorPins[motorNumber].pinIN2, LOW);
}
}
void moveCar(int inputValue)
{
Serial.printf("Got value as %d\n", inputValue);
switch(inputValue)
{
case UP:
rotateMotor(RIGHT_MOTOR, FORWARD);
rotateMotor(LEFT_MOTOR, FORWARD);
break;
case DOWN:
rotateMotor(RIGHT_MOTOR, BACKWARD);
rotateMotor(LEFT_MOTOR, BACKWARD);
break;
case LEFT:
rotateMotor(RIGHT_MOTOR, FORWARD);
rotateMotor(LEFT_MOTOR, BACKWARD);
break;
case RIGHT:
rotateMotor(RIGHT_MOTOR, BACKWARD);
rotateMotor(LEFT_MOTOR, FORWARD);
break;
case STOP:
rotateMotor(RIGHT_MOTOR, STOP);
rotateMotor(LEFT_MOTOR, STOP);
break;
default:
rotateMotor(RIGHT_MOTOR, STOP);
rotateMotor(LEFT_MOTOR, STOP);
break;
}
}
void handleRoot(AsyncWebServerRequest *request)
{
request->send_P(200, "text/html", htmlHomePage);
}
void handleNotFound(AsyncWebServerRequest *request)
{
request->send(404, "text/plain", "File Not Found");
}
void onCarInputWebSocketEvent(AsyncWebSocket *server,
AsyncWebSocketClient *client,
AwsEventType type,
void *arg,
uint8_t *data,
size_t len)
{
switch (type)
{
case WS_EVT_CONNECT:
Serial.printf("WebSocket client #%u connected from %s\n", client->id(), client->remoteIP().toString().c_str());
break;
case WS_EVT_DISCONNECT:
Serial.printf("WebSocket client #%u disconnected\n", client->id());
moveCar(0);
ledcWrite(PWMLightChannel, 0);
panServo.write(90);
tiltServo.write(90);
break;
case WS_EVT_DATA:
AwsFrameInfo *info;
info = (AwsFrameInfo*)arg;
if (info->final && info->index == 0 && info->len == len && info->opcode == WS_TEXT)
{
std::string myData = "";
myData.assign((char *)data, len);
std::istringstream ss(myData);
std::string key, value;
std::getline(ss, key, ',');
std::getline(ss, value, ',');
Serial.printf("Key [%s] Value[%s]\n", key.c_str(), value.c_str());
int valueInt = atoi(value.c_str());
if (key == "MoveCar")
{
moveCar(valueInt);
}
else if (key == "Speed")
{
ledcWrite(PWMSpeedChannel, valueInt);
}
else if (key == "Light")
{
ledcWrite(PWMLightChannel, valueInt);
}
else if (key == "Pan")
{
panServo.write(valueInt);
}
else if (key == "Tilt")
{
tiltServo.write(valueInt);
}
}
break;
case WS_EVT_PONG:
case WS_EVT_ERROR:
break;
default:
break;
}
}
void onCameraWebSocketEvent(AsyncWebSocket *server,
AsyncWebSocketClient *client,
AwsEventType type,
void *arg,
uint8_t *data,
size_t len)
{
switch (type)
{
case WS_EVT_CONNECT:
Serial.printf("WebSocket client #%u connected from %s\n", client->id(), client->remoteIP().toString().c_str());
cameraClientId = client->id();
break;
case WS_EVT_DISCONNECT:
Serial.printf("WebSocket client #%u disconnected\n", client->id());
cameraClientId = 0;
break;
case WS_EVT_DATA:
break;
case WS_EVT_PONG:
case WS_EVT_ERROR:
break;
default:
break;
}
}
void setupCamera()
{
camera_config_t config;
config.ledc_channel = LEDC_CHANNEL_4;
config.ledc_timer = LEDC_TIMER_2;
config.pin_d0 = Y2_GPIO_NUM;
config.pin_d1 = Y3_GPIO_NUM;
config.pin_d2 = Y4_GPIO_NUM;
config.pin_d3 = Y5_GPIO_NUM;
config.pin_d4 = Y6_GPIO_NUM;
config.pin_d5 = Y7_GPIO_NUM;
config.pin_d6 = Y8_GPIO_NUM;
config.pin_d7 = Y9_GPIO_NUM;
config.pin_xclk = XCLK_GPIO_NUM;
config.pin_pclk = PCLK_GPIO_NUM;
config.pin_vsync = VSYNC_GPIO_NUM;
config.pin_href = HREF_GPIO_NUM;
config.pin_sscb_sda = SIOD_GPIO_NUM;
config.pin_sscb_scl = SIOC_GPIO_NUM;
config.pin_pwdn = PWDN_GPIO_NUM;
config.pin_reset = RESET_GPIO_NUM;
config.xclk_freq_hz = 20000000;
config.pixel_format = PIXFORMAT_JPEG;
config.frame_size = FRAMESIZE_VGA;
config.jpeg_quality = 10;
config.fb_count = 1;
// camera init
esp_err_t err = esp_camera_init(&config);
if (err != ESP_OK)
{
Serial.printf("Camera init failed with error 0x%x", err);
return;
}
if (psramFound())
{
heap_caps_malloc_extmem_enable(20000);
Serial.printf("PSRAM initialized. malloc to take memory from psram above this size");
}
}
void sendCameraPicture()
{
if (cameraClientId == 0)
{
return;
}
unsigned long startTime1 = millis();
//capture a frame
camera_fb_t * fb = esp_camera_fb_get();
if (!fb)
{
Serial.println("Frame buffer could not be acquired");
return;
}
unsigned long startTime2 = millis();
wsCamera.binary(cameraClientId, fb->buf, fb->len);
esp_camera_fb_return(fb);
//Wait for message to be delivered
while (true)
{
AsyncWebSocketClient * clientPointer = wsCamera.client(cameraClientId);
if (!clientPointer || !(clientPointer->queueIsFull()))
{
break;
}
delay(1);
}
unsigned long startTime3 = millis();
Serial.printf("Time taken Total: %d|%d|%d\n",startTime3 - startTime1, startTime2 - startTime1, startTime3-startTime2 );
}
void setUpPinModes()
{
panServo.attach(PAN_PIN);
tiltServo.attach(TILT_PIN);
//Set up PWM
ledcSetup(PWMSpeedChannel, PWMFreq, PWMResolution);
ledcSetup(PWMLightChannel, PWMFreq, PWMResolution);
for (int i = 0; i < motorPins.size(); i++)
{
pinMode(motorPins[i].pinEn, OUTPUT);
pinMode(motorPins[i].pinIN1, OUTPUT);
pinMode(motorPins[i].pinIN2, OUTPUT);
/* Attach the PWM Channel to the motor enb Pin */
ledcAttachPin(motorPins[i].pinEn, PWMSpeedChannel);
}
moveCar(STOP);
pinMode(LIGHT_PIN, OUTPUT);
ledcAttachPin(LIGHT_PIN, PWMLightChannel);
}
void setup(void)
{
setUpPinModes();
//Serial.begin(115200);
WiFi.softAP(ssid, password);
IPAddress IP = WiFi.softAPIP();
Serial.print("AP IP address: ");
Serial.println(IP);
server.on("/", HTTP_GET, handleRoot);
server.onNotFound(handleNotFound);
wsCamera.onEvent(onCameraWebSocketEvent);
server.addHandler(&wsCamera);
wsCarInput.onEvent(onCarInputWebSocketEvent);
server.addHandler(&wsCarInput);
server.begin();
Serial.println("HTTP server started");
setupCamera();
}
void loop()
{
wsCamera.cleanupClients();
wsCarInput.cleanupClients();
sendCameraPicture();
Serial.printf("SPIRam Total heap %d, SPIRam Free Heap %d\n", ESP.getPsramSize(), ESP.getFreePsram());
}Installing Required Libraries
To program the ESP32 and ESP32-CAM, you need the following libraries installed in your Arduino IDE:
- ESP32 Board Support
- Go to File → Preferences and paste the following URL into “Additional Board Manager URLs”:arduinoCopy code
https://dl.espressif.com/dl/package_esp32_index.json
- Then, install the ESP32 by Espressif Systems board package in the Boards Manager.
- Servo Library
- Go to Sketch → Include Library → Manage Libraries and install the “Servo” library.
- ESP32-CAM Web Streaming Library
- Download the “ESP32-CAM” example code or use the
ESP32WebServerlibrary to stream video and host a control interface.
- Download the “ESP32-CAM” example code or use the
Programming the ESP32
The code involves three main sections:
- Motor Control Code: Handles the DC motor movement for forward, backward, left, and right motion.
- Servo Control Code: Adjusts the position of the camera using pan and tilt servo motors.
- Web Interface Code: Hosts an HTML page on the ESP32, enabling users to control the car via buttons and view live camera feed.
You can write and upload the code using Arduino IDE. Here’s a simplified example:
// Include necessary libraries
#include <WiFi.h>
#include <ESP32Servo.h>
#include "esp_camera.h"

// Define Wi-Fi credentials
const char* ssid = "Your_SSID";
const char* password = "Your_PASSWORD";

// Motor and Servo Pin Definitions
const int motor1Pin1 = 14;
const int motor1Pin2 = 27;
const int servoPanPin = 12;
const int servoTiltPin = 13;

// Initialize Servo Motors
Servo panServo;
Servo tiltServo;

void setup() {
  // Initialize Serial Monitor
  Serial.begin(115200);

  // Connect to Wi-Fi
  WiFi.begin(ssid, password);
  while (WiFi.status() != WL_CONNECTED) {
    delay(1000);
    Serial.println("Connecting to Wi-Fi...");
  }
  Serial.println("Connected!");

  // Set motor pins as outputs
  pinMode(motor1Pin1, OUTPUT);
  pinMode(motor1Pin2, OUTPUT);

  // Attach servos
  panServo.attach(servoPanPin);
  tiltServo.attach(servoTiltPin);
}

void loop() {
  // Example: Move Motors Forward
  digitalWrite(motor1Pin1, HIGH);
  digitalWrite(motor1Pin2, LOW);

  // Example: Pan and Tilt Motion
  panServo.write(90);  // Pan at center
  tiltServo.write(45); // Tilt slightly up

  delay(1000); // Wait for 1 second
}
Note: Replace
Your_SSIDandYour_PASSWORDwith your Wi-Fi credentials. You can extend this code to include full motor movement, live camera feed, and web control functionality.
Creating the Web Interface
The ESP32 will host a simple HTML page as the control interface. This interface will have buttons for:
- Moving the car forward, backward, left, and right.
- Adjusting the pan and tilt of the camera.
- Turning the LED lights on/off.
- Displaying the live video feed from the ESP32-CAM.
Testing the Project
- Power up the ESP32 and ESP32-CAM module.
- Connect to the web interface using the IP address provided by the ESP32 (printed in the Serial Monitor).
- Control the car’s movement, camera pan/tilt, and LED lights using the buttons.
- Monitor the live video feed in the interface.


It’s not my first time to pay a visit this site,
i am browsing this web site dailly and get fastidious information from here all thhe time. http://Boyarka-Inform.com/
Thank you for visiting my website almost every day. Please let me know if you have anything you would like to know.