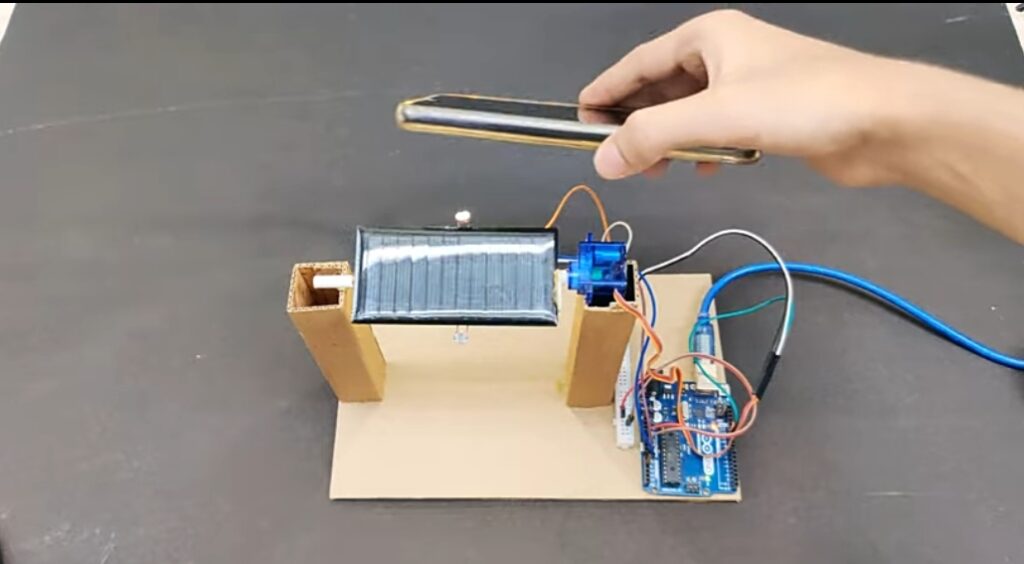
Solar Panel Sunlight Tracking Project
To maximize the efficiency of solar panels, technologies are developed to track sunlight. In this project, solar panels are aligned dynamically to follow the sun’s position, enabling maximum absorption of sunlight throughout the day. Today, we will create a prototype for a solar tracking system using a Servo Motor and LDR (Light Dependent Resistor).
Why Is Solar Tracking Important?
Conventional solar panels remain stationary, and as the sun moves, they lose efficiency during certain times of the day. However, a solar tracking system adjusts the position of the panel according to the sun’s movement, which results in:
- Increased electricity generation.
- Enhanced efficiency of the panels.
- Promotion of renewable energy usage.
Project Concept
We will use two LDR sensors to detect sunlight. These sensors will measure the light intensity and direct the solar panel to rotate using a Servo Motor to ensure maximum light absorption.
Required Components
To build this project, you will need the following:
- Arduino Uno – 1 unit
- Servo Motor (SG90) – 1 unit
- LDR (Light Dependent Resistor) – 2 units
- 10kΩ Resistor – 2 units
- Breadboard and jumper wires
- A small solar panel (for demonstration purposes)
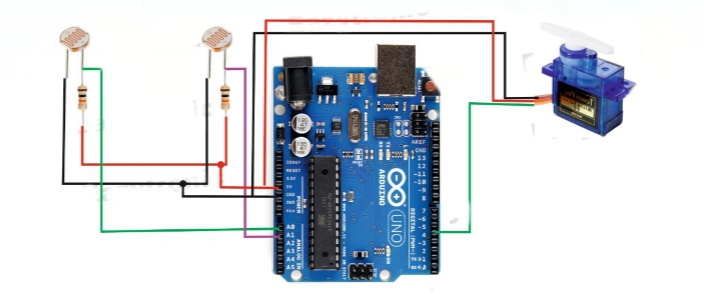
Circuit Connection
Follow these steps to set up the circuit:
- Servo Motor Connection:
- Connect the Servo Motor’s signal pin to Arduino PWM pin 4.
- Connect the VCC and GND to the 5V and GND pins of Arduino.
- LDR Connection:
- Connect one end of the first LDR (LDR1) to the A0 pin and the other end to the 10kΩ resistor, which is grounded.
- Similarly, connect the second LDR (LDR2) to A1 and ground it through another 10kΩ resistor.
- Powering Arduino and Servo Motor:
- Ensure the 5V from Arduino powers both the LDR sensors and the Servo Motor.
Code Explanation
Below is the code for this project, which adjusts the solar panel’s position based on sunlight direction:
#include <Servo.h>
Servo sg90;
int initial_position = 90;
int LDR1 = A0;
int LDR2 = A1;
int error = 5;
int servopin = 4;

void setup() {
  sg90.attach(servopin);
  pinMode(LDR1, INPUT);
  pinMode(LDR2, INPUT);
  sg90.write(initial_position);
  delay(2000);
  Serial.begin(9600);
}

void loop() {
  int R1 = analogRead(LDR1);
  int R2 = analogRead(LDR2);

  Serial.print("LDR1: ");
  Serial.println(R1);
  Serial.print("LDR2: ");
  Serial.println(R2);
  delay(300);

  int diff = abs(R1 - R2);
  if (diff > error) {
    if (R1 > R2) {
      initial_position--;
    } else if (R1 < R2) {
      initial_position++;
    }

    if (initial_position < 0) initial_position = 0;
    if (initial_position > 180) initial_position = 180;

    sg90.write(initial_position);
    delay(100);
  }
}
Types of Solar Tracking
- Single-Axis Tracking
Moves the solar panel in one direction (Horizontal or Vertical). Ideal for regions where the sun’s movement is predominantly in a specific direction. - Dual-Axis Tracking
Adjusts the solar panel in both directions (Horizontal and Vertical). Suitable for areas where the sun’s path varies significantly.
Alternative Sensors
Besides LDR, other sensors can also be used for building solar tracking systems, such as:
- Photodiode Sensor: More precise in detecting light.
- PIR Sensor: Detects both light and heat.
- Lux Meter: Advanced technology for measuring light intensity.
Simplified Working Explanation
- How Does LDR Work?
- The resistance of an LDR depends on light intensity.
- Higher light decreases resistance.
- Lower light increases resistance.
- Arduino reads this changing resistance using the
analogRead()function.
- How Does the Servo Motor Work?
- A Servo Motor can rotate to specific angles.
- The
sg90.write()function sets the desired angle for the Servo Motor.
Practical Applications of This Project
- Commercial Solar Farms:
Increases energy production by up to 20-25%. - Smart Home Systems:
Reduces electricity costs. - Education and Research:
Serves as an ideal project for students to explore renewable energy.
Tips for Error-Free Implementation
- Positioning LDR Sensors:
Ensure no permanent obstructions between the sensors and sunlight. - Servo Motor Calibration:
Confirm the Servo Motor rotates to the correct angles.
Cost and Time
- Cost: ₹500-₹1000 (or $10-$15).
- Time: 2-3 hours for experienced users, 1-2 days for beginners.
Improving Accuracy and Results
- Use advanced sensors.
- Control the Servo Motor more smoothly using PWM signals.
- Add a Real-Time Clock (RTC) for sun position prediction.
Future Development Ideas
- Weather Tracking Integration:
Use Weather APIs to adjust panel position during cloudy or rainy days. - Energy Monitoring System:
Integrate an energy meter to measure electricity generation.
Download and Supporting Materials
Download Project Files
Includes circuit diagram, code, and necessary documentation.
Conclusion
This project is an excellent and simple way to enhance the efficiency of solar panels. When scaled up, it can become a highly functional solar tracking system for practical applications.


