DIY Home Automation System Using Arduino and MIT App Inventor
Introduction
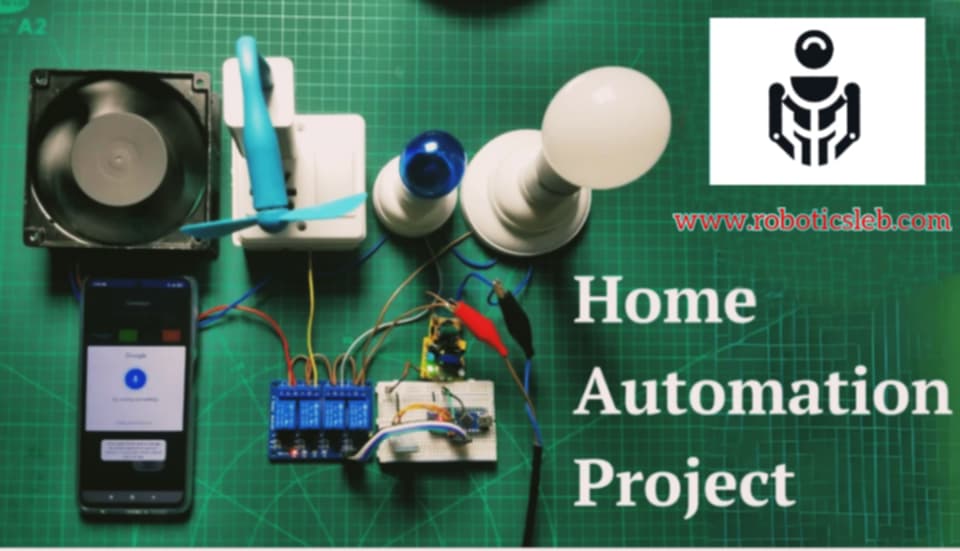
In the age of smart technology, controlling home appliances from a smartphone is not just convenient but also efficient. This guide will walk you through building a DIY home automation system using an Arduino, a relay module, and an Android app created with MIT App Inventor. With this setup, you’ll be able to control various household devices, like lights, fans, and sockets, using either buttons or voice commands on your Android device.
Project Overview by MArobotics This home automation system, developed by MArobotics, combines Arduino technology with Android smartphone capabilities, allowing users to control appliances like lights, fans, and sockets. The Android app features manual switches and voice commands, making it a versatile solution for smart living.
Components Needed
- Arduino Nano (or compatible)
- HC-05 Bluetooth Module
- 4-Channel Relay Module
- Android Smartphone with MIT App Inventor App
- 5V 2A Power Adapter
- Electrical Appliances (e.g., light bulbs, fan, socket)
Wiring and Connections
- Power Setup
- Connect the 5V 2A adapter to power the relay module and Arduino.
- Ensure that the Live (L) and Neutral (N) wires are correctly connected as shown in the wiring diagram for AC appliances.
- Arduino and Relay Module
- Connect Arduino pins D4, D5, D6, and D7 to the IN1, IN2, IN3, and IN4 pins on the relay module. These pins will control each relay, allowing the connected appliances to turn on or off.
- Bluetooth Module (HC-05)
- Connect the RX and TX pins of the HC-05 module to D2 and D3 of the Arduino Nano, respectively. This setup enables wireless communication between the Arduino and the Android app.
- Relay Output Connections
- Attach each appliance (light bulb, fan, socket) to one of the relay channels, as indicated in the diagram.
- Ensure that the live and neutral lines of each appliance are correctly connected to the relay for safe operation.
Setting Up the Android App
- MIT App Inventor: Open MIT App Inventor and create a new project for home automation.
- Interface Design:
- Add buttons for each appliance: Power, Light, Lamp, and Socket.
- Include a Voice Command button to enable voice-activated controls.
- Bluetooth Configuration:
- In the app’s blocks editor, set up commands to send specific characters (e.g., ‘A’, ‘a’, ‘B’, etc.) to the Arduino based on button clicks or voice commands.
Code Explanation
The Arduino code provided enables communication with the Android app and controls the relays. Here’s how it works:
- Setting Up Serial Communication:
SoftwareSerialis used for Bluetooth communication with the HC-05 module on pins D2 (RX) and D3 (TX).- The main serial communication for debugging is set up with
Serial.begin(9600).
- Relay Control and EEPROM Storage:
- Each relay is linked to a specific Arduino pin, which is declared and set to output mode. The initial state is set to off (1).
- The EEPROM is used to store the last state of each appliance (relay) and the power status. This ensures that the system remembers the previous state even after a reset or power loss.
- Bluetooth Command Handling:
- The app sends specific characters for each appliance control command:
- ‘A’/’a’ for turning Relay1 off/on
- ‘B’/’b’ for Relay2
- ‘C’/’c’ for Relay3
- ‘D’/’d’ for Relay4
- ‘E’/’e’ for toggling the power status, affecting all appliances.
- The Arduino reads these commands from the Bluetooth module, updates the corresponding relay state, and saves the state to the EEPROM.
- The app sends specific characters for each appliance control command:
- Power Control Logic:
- If
poweris set to 1, all appliances are turned on, overriding individual relay settings. - If
poweris 0, each relay follows its individual stored state from the EEPROM.
- If
- Sending Feedback to App:
- The Arduino sends the current power and relay states to the app for display, allowing the app to reflect real-time statuses.
Daigrams

Code
The following code manages the main functions of the automation system:
#include <EEPROM.h>
#include <SoftwareSerial.h>
SoftwareSerial BT_Serial(2, 3); // RX, TX

#define Relay1 4 // Load1 Pin Out
#define Relay2 5 // Load2 Pin Out
#define Relay3 6 // Load3 Pin Out
#define Relay4 7 // Load4 Pin Out

char bt_data; // variable to receive data from the serial port
int load1, load2, load3, load4, power;

void setup(){
Serial.begin(9600);
BT_Serial.begin(9600);

pinMode(Relay1, OUTPUT); digitalWrite(Relay1, 1);
pinMode(Relay2, OUTPUT); digitalWrite(Relay2, 1);
pinMode(Relay3, OUTPUT); digitalWrite(Relay3, 1);
pinMode(Relay4, OUTPUT); digitalWrite(Relay4, 1);

load1 = EEPROM.read(1);
load2 = EEPROM.read(2);
load3 = EEPROM.read(3);
load4 = EEPROM.read(4);

power = EEPROM.read(5);
delay(500);
}

void loop() {
if(BT_Serial.available()>0){bt_data = BT_Serial.read();}

if(bt_data == 'A'){load1=0;EEPROM.write(1, load1);}
if(bt_data == 'a'){load1=1;EEPROM.write(1, load1);}

if(bt_data == 'B'){load2=0;EEPROM.write(2, load2);}
if(bt_data == 'b'){load2=1;EEPROM.write(2, load2);}

if(bt_data == 'C'){load3=0;EEPROM.write(3, load3);}
if(bt_data == 'c'){load3=1;EEPROM.write(3, load3);}

if(bt_data == 'D'){load4=0;EEPROM.write(4, load4);}
if(bt_data == 'd'){load4=1;EEPROM.write(4, load4);}

if(bt_data == 'E'){power=0;EEPROM.write(5, power);}
if(bt_data == 'e'){power=1;EEPROM.write(5, power);}

bt_data = '0';

if(power==1){
digitalWrite(Relay1, 1);
digitalWrite(Relay2, 1);
digitalWrite(Relay3, 1);
digitalWrite(Relay4, 1);
}else{
digitalWrite(Relay1, load1);
digitalWrite(Relay2, load2);
digitalWrite(Relay3, load3);
digitalWrite(Relay4, load4);
}

 BT_Serial.print(power); //send distance to MIT App
 BT_Serial.print(";");
 BT_Serial.print(load1); //send distance to MIT App
 BT_Serial.print(";");
 BT_Serial.print(load2); //send distance to MIT App
 BT_Serial.print(";");
 BT_Serial.print(load3); //send distance to MIT App
 BT_Serial.print(";");
 BT_Serial.print(load4); //send distance to MIT App
 BT_Serial.println("

delay(500);
}
Why This Project is Useful
This home automation project is an effective solution for controlling home appliances remotely. It’s especially useful for people with mobility challenges or for making a home more energy-efficient by turning off appliances when not needed. Additionally, this setup is a great way to learn about Bluetooth communication, Arduino programming, and interfacing with high-voltage appliances safely.
Conclusion
With this setup, you have a fully functional, smartphone-controlled home automation system that brings convenience and efficiency to your everyday life. This project also provides a base for future upgrades, such as adding more appliances or integrating additional sensors.


1 thought on “Automation System Using Arduino and MIT App Inventor”