How to Set Up a Password-Protected Door Lock System with Arduino
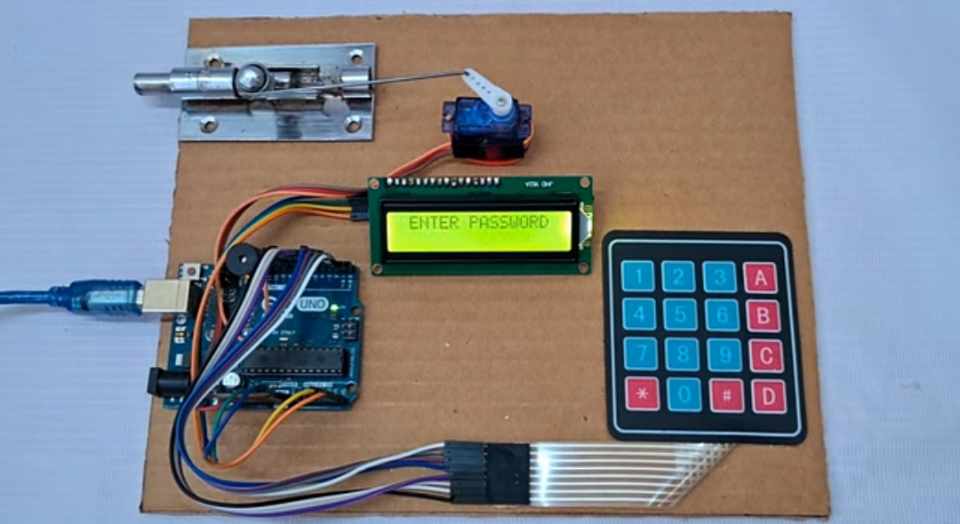
This guide will walk you through setting up a password-protected door lock system using an Arduino Uno, a 4×4 keypad, an LCD display, a servo motor, and a buzzer. This system is designed to unlock or lock a door based on the correct password entered on the keypad. The setup is simple yet effective for securing your belongings.
Components Needed:
- Arduino Uno
- 4×4 Keypad
- 16×2 I2C LCD Display
- Servo Motor
- Buzzer
- Jumper Wires
- Breadboard (optional)
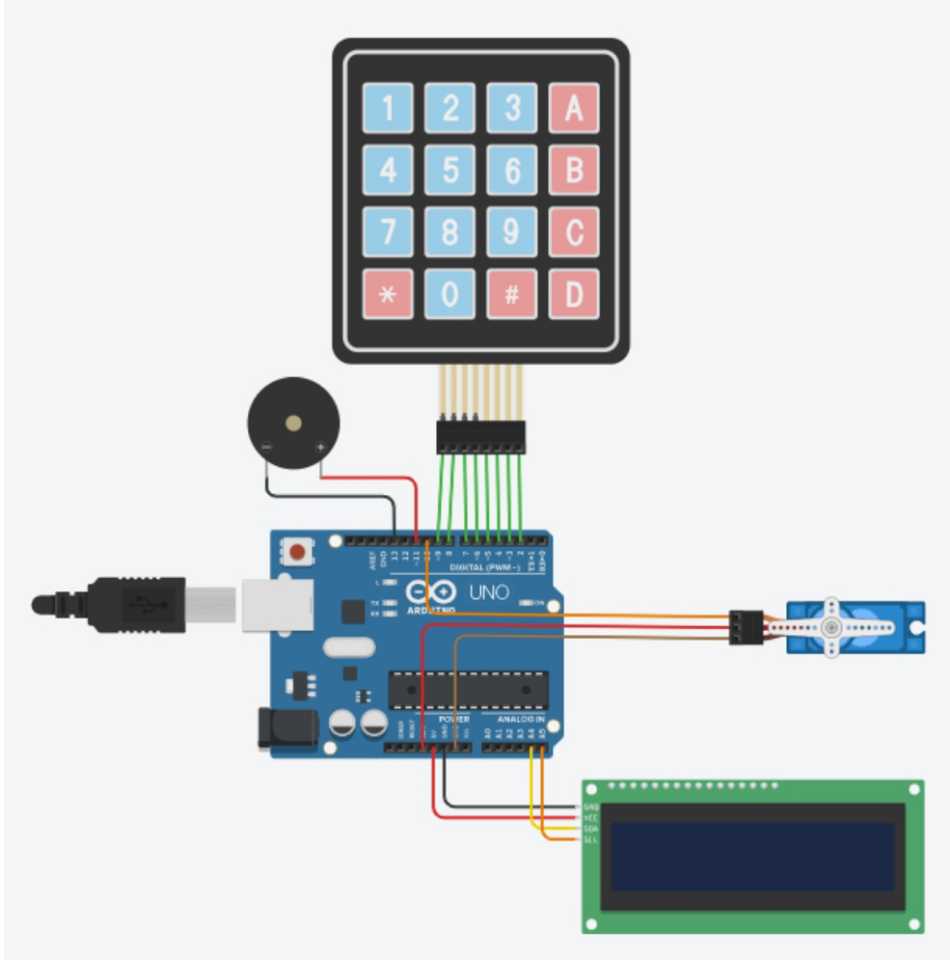
Circuit Diagram
Step 1: Wiring the Components
- Keypad: Connect the keypad pins to the Arduino digital pins as follows:
- Pin 1 to Arduino pin 2
- Pin 2 to Arduino pin 3
- Pin 3 to Arduino pin 4
- Pin 4 to Arduino pin 5
- Pin 5 to Arduino pin 6
- Pin 6 to Arduino pin 7
- Pin 7 to Arduino pin 8
- Pin 8 to Arduino pin 9
- LCD Display: Connect the 16×2 LCD to the Arduino using the I2C protocol.
- Connect the SDA pin of the LCD to the A4 pin on the Arduino.
- Connect the SCL pin of the LCD to the A5 pin on the Arduino.
- Connect VCC to 5V and GND to GND.
- Servo Motor: Connect the servo motor’s control wire to Arduino pin 10, power wire to 5V, and ground wire to GND.
- Buzzer: Connect the positive lead of the buzzer to pin 11 and the negative lead to GND.
Step 2: Code Upload
- Open the Arduino IDE.
- Copy and paste the provided code (available at the end of this guide) into the Arduino IDE.
- Make sure to install the required libraries, including
Servo,LiquidCrystal_I2C,Keypad, andPassword. To install libraries, go to Sketch > Include Library > Manage Libraries, search for each library, and install it. - Once everything is set, connect the Arduino to your computer, select the correct board and port, and upload the code.
Step 3: How the System Works
- Password Input: The system prompts the user to enter a password on the LCD display. You’ll see “Enter Password” on the screen.
- Password Verification: If the entered password matches the predefined one (
0123in the code), the servo motor unlocks the door by rotating to the unlock position, and the buzzer gives a confirmation beep. - Incorrect Password: If the entered password is incorrect, the buzzer will beep multiple times, and the display will show “Wrong Password! Please Try Again.”
- Door Lock/Unlock: After a successful entry, pressing
Don the keypad will toggle between locking and unlocking the door.
Step 4: Testing the System
- Power up the Arduino and watch the LCD. It should display “Welcome to Door Lock System” initially.
- After 3 seconds, it will ask for the password.
- Enter
0123using the keypad to test the unlocking mechanism. - Use the
Dkey to lock or unlock the door repeatedly, ensuring the servo responds accurately.
Code
Here’s the full code to run this project:
#include <Servo.h>
#include <LiquidCrystal_I2C.h>
#include <Keypad.h>
#include <Password.h>

#define buzzer 11

Servo servo;
LiquidCrystal_I2C lcd(0x27, 16, 2);

String newPasswordString; //hold the new password
char newPassword[6]; //charater string of newPasswordString
byte a = 5;
bool value = true;

Password password = Password("0123"); //Enter your password

byte maxPasswordLength = 6;
byte currentPasswordLength = 0;
const byte ROWS = 4; // Four rows
const byte COLS = 4; // Four columns

char keys[ROWS][COLS] = {
  {'D', 'C', 'B', 'A'},
  {'#', '9', '6', '3'},
  {'0', '8', '5', '2'},
  {'*', '7', '4', '1'},
};

byte rowPins[ROWS] = {2, 3, 4, 5};
byte colPins[COLS] = {6, 7, 8, 9};

Keypad keypad = Keypad( makeKeymap(keys), rowPins, colPins, ROWS, COLS );

void setup() {
  Serial.begin(9600);
  pinMode(buzzer, OUTPUT);
  servo.attach(10);
  servo.write(50);
  lcd.init();
  lcd.backlight();
  lcd.setCursor(3, 0);
  lcd.print("WELCOME TO");
  lcd.setCursor(0, 1);
  lcd.print("DOOR LOCK SYSTEM");
  delay(3000);
  lcd.clear();
}

void loop() {
  lcd.setCursor(1, 0);
  lcd.print("ENTER PASSWORD");

  char key = keypad.getKey();
  if (key != NO_KEY) {
    delay(60);
    if (key == 'C') {
      resetPassword();
    } else if (key == 'D') {
      if (value == true) {
        doorlocked();
        value = false;
      } else if (value == false) {
        dooropen();
        value = true;
      }
    } else {
      processNumberKey(key);
    }
  }
}

void processNumberKey(char key) {
  lcd.setCursor(a, 1);
  lcd.print("*");
  a++;
  if (a == 11) {
    a = 5;
  }
  currentPasswordLength++;
  password.append(key);

  if (currentPasswordLength == maxPasswordLength) {
    doorlocked();
    dooropen();
  }
}

void dooropen() {
  if (password.evaluate()) {
    digitalWrite(buzzer, HIGH);
    delay(300);
    digitalWrite(buzzer, LOW);
    servo.write(50);
    delay(100);
    lcd.setCursor(0, 0);
    lcd.print("CORRECT PASSWORD");
    lcd.setCursor(0, 1);
    lcd.print("DOOR OPENED");
    delay(2000);
    lcd.clear();
    a = 5;
  } else {
    wrongPassword();
  }
  resetPassword();
}

void doorlocked() {
  if (password.evaluate()) {
    digitalWrite(buzzer, HIGH);
    delay(300);
    digitalWrite(buzzer, LOW);
    servo.write(110);
    delay(100);
    lcd.setCursor(0, 0);
    lcd.print("CORRECT PASSWORD");
    lcd.setCursor(2, 1);
    lcd.print("DOOR LOCKED");
    delay(2000);
    lcd.clear();
    a = 5;
  } else {
    wrongPassword();
  }
  resetPassword();
}

void wrongPassword() {
  for (int i = 0; i < 3; i++) {
    digitalWrite(buzzer, HIGH);
    delay(200);
    digitalWrite(buzzer, LOW);
    delay(200);
  }
  lcd.setCursor(0, 0);
  lcd.print("WRONG PASSWORD!");
  lcd.setCursor(0, 1);
  lcd.print("PLEASE TRY AGAIN");
  delay(2000);
  lcd.clear();
  a = 5;
}

void resetPassword() {
  password.reset();
  currentPasswordLength = 0;
  lcd.clear();
  a = 5;
}
Hope You’ve Successfully Built Your Door Lock System !
If you follow all the steps carefully, I am sure your door lock system will work. And if it doesn’t work, then you will see again whether your words are wrong or not


nice project