Building a Bluetooth-Controlled Car with Arduino: A Step-by-Step Guide
In this project, you’ll learn how to build a Bluetooth-controlled car using an Arduino, the HC-05 Bluetooth module, and the L298N motor driver. This setup allows you to control the car’s movement directly from your smartphone, enabling it to move forward, backward, and turn left or right. All the components used are commonly accessible, and we’ll go through the process step-by-step, from wiring to code and setting up the mobile app.
Components Required
- DC Motors – 4 motors (generic) to drive each wheel.
- L298N Motor Driver – A reliable module to handle motor control and power.
- 7.4V LiPo Battery – Power source for the L298N.
- 9V Battery – Power source for the Arduino (or an alternative source to provide 5V directly).
- Arduino UNO – The brain of the project, responsible for processing Bluetooth commands and controlling motor functions.
- HC-05 Bluetooth Module – This module connects to the Android app to receive movement commands.
- Jumper Wires – For connecting components.
- Battery Connectors – DC power adapter and connectors to link batteries to modules.
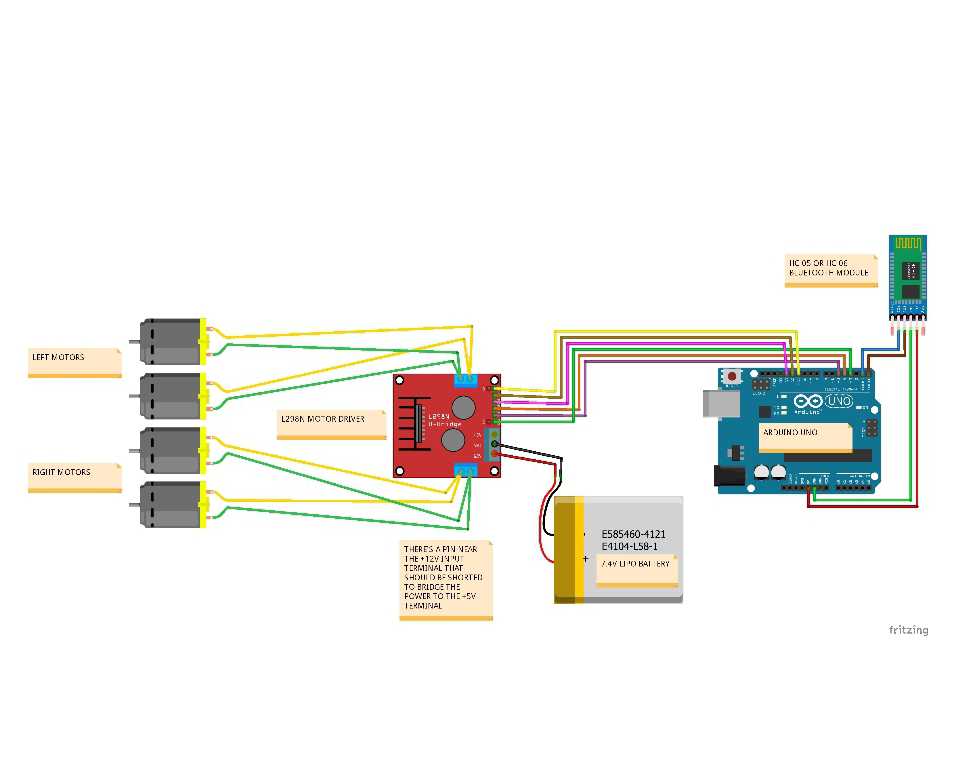
Wiring Instructions
HC-05 Bluetooth Module
- VCC: Connect to 5V on the Arduino.
- GND: Connect to GND on the Arduino.
- TXD: Connect to the RX pin on the Arduino (to receive data).
- RXD: Connect to the TX pin on the Arduino (to send data).
L298N Motor Driver
- Power Input: Connect the 7.4V LiPo battery to the L298N with the black wire to the 12V pin and red wire to the GND pin.
For the motor pins:
- ENA: Connect to Arduino Pin 3.
- IN1 and IN2: Connect to Pins 4 and 5 on the Arduino for the left motor.
- IN3 and IN4: Connect to Pins 13 and 12 on the Arduino for the right motor.
- ENB: Connect to Arduino Pin 11.
Wire the motors correctly to the output pins on the L298N, ensuring left motors are connected to the left output and right motors to the right output.
Powering the Setup
Use the 9V battery to power the Arduino, or use an alternative power setup to ensure it has a steady 5V supply. The L298N will handle the motor power separately, drawing current directly from the 7.4V battery.
Arduino Code
Below is the code to control the car. The Arduino listens for commands (‘F’, ‘B’, ‘L’, ‘R’, ‘S’) from the HC-05 Bluetooth module and translates them into motor actions.
COD
int motor1Pin1 = 4;
int motor1Pin2 = 5;
int enable1Pin = 3;
int motor2Pin1  = 12;
int motor2Pin2 = 13;
int enable2Pin = 11;
int state;
int flag=0;
int stateStop=0;

void setup() {
    pinMode(motor1Pin1, OUTPUT);
    pinMode(motor1Pin2, OUTPUT);
    pinMode(enable1Pin,  OUTPUT);
    pinMode(motor2Pin1, OUTPUT);
    pinMode(motor2Pin2, OUTPUT);
    pinMode(enable2Pin, OUTPUT);
    digitalWrite(enable1Pin, HIGH);
    digitalWrite(enable2Pin,  HIGH);
    Serial.begin(9600);
}

void loop() {
    if(Serial.available() > 0){
        state = Serial.read();
        flag=0;
    }

    if (state == 'F') {
        digitalWrite(motor1Pin1, HIGH);
        digitalWrite(motor1Pin2, LOW);
        digitalWrite(motor2Pin1, LOW);
        digitalWrite(motor2Pin2, HIGH);
        if(flag == 0){
            Serial.println("Go Forward!");
            flag=1;
        }
    }
    else if (state == 'R') {
        digitalWrite(motor1Pin1, HIGH);
        digitalWrite(motor1Pin2, LOW);
        digitalWrite(motor2Pin1, LOW);
        digitalWrite(motor2Pin2, LOW);
        if(flag == 0){
            Serial.println("Turn LEFT");
            flag=1;
        }
        delay(1000);
        state=3;
        stateStop=1;
    }
    else if (state == 'S' || stateStop == 1) {
        digitalWrite(motor1Pin1, LOW);
        digitalWrite(motor1Pin2, LOW);
        digitalWrite(motor2Pin1, LOW);
        digitalWrite(motor2Pin2, LOW);
        if(flag == 0){
            Serial.println("STOP!");
            flag=1;
        }
        stateStop=0;
    }
    else if (state == 'L') {
        digitalWrite(motor1Pin1, LOW);
        digitalWrite(motor1Pin2, LOW);
        digitalWrite(motor2Pin1, LOW);
        digitalWrite(motor2Pin2, HIGH);
        if(flag == 0){
            Serial.println("Turn RIGHT");
            flag=1;
        }
        delay(1000);
        state=3;
        stateStop=1;
    }
    else if (state == 'B') {
        digitalWrite(motor1Pin1, LOW);
        digitalWrite(motor1Pin2, HIGH);
        digitalWrite(motor2Pin1, HIGH);
        digitalWrite(motor2Pin2, LOW);
        if(flag == 0){
            Serial.println("Reverse!");
            flag=1;
        }
    }
    Serial.println(state);
}
Mobile App Setup with MIT App Inventor
The control interface is created using MIT App Inventor, which allows you to build a simple Android app. When you press buttons on the app, they send commands to the HC-05 module. Each button triggers a specific command:
- Forward (F): Both motors run forward.
- Backward (B): Both motors reverse.
- Left (R): Turns left by stopping one side of the motors.
- Right (L): Turns right by stopping the other side of the motors.
- Stop (S): Stops all motors.
This setup works smoothly and allows real-time control from your smartphone.
Conclusion
This project provides a simple yet powerful introduction to building a Bluetooth-controlled car. With this setup, you’ve not only learned to control motors via Arduino but also integrated Bluetooth communication and designed a custom control interface on an Android app. Feel free to experiment with different speeds or try adding more functions to the app for an enhanced experience.
Daigram