Arduino CNC Shield V3: Complete Guide and Setup Tutorial
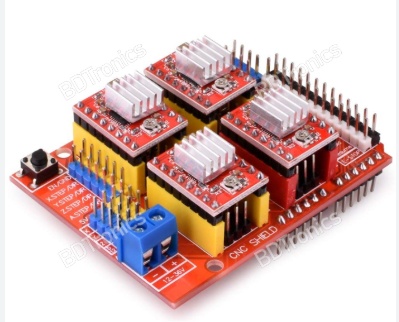
The CNC Shield V3 is a versatile and functional extension board specifically designed to work with Arduino boards, such as the Arduino UNO and Arduino Mega. It is widely used for building various automated projects, including CNC machines, 3D printers, and laser cutters. This shield simplifies the process of controlling stepper motors, which are essential for precision movements in these types of machines.
CNC machines and 3D printers require precise and smooth motor control to move axes, extruders, or cutting tools with accuracy. The CNC Shield V3 provides a convenient and cost-effective solution to achieve this. It works seamlessly with stepper drivers like A4988, DRV8825, or the more advanced SilentStepStick drivers, which are responsible for generating the necessary pulses to control the stepper motors.
With its plug-and-play design, the CNC Shield V3 can be mounted directly onto the Arduino board without additional wiring. It allows easy connections for multiple motors, end-stop sensors, and other modules, making it an excellent choice for hobbyists, students, and engineers working on DIY automation projects.
In this comprehensive guide, we will explain step-by-step how to set up and connect the CNC Shield V3 with your Arduino board. We will also demonstrate how to write and upload the code required to control stepper motors. Additionally, we will explore the shield’s features, practical applications, and tips for safe usage. By the end of this guide, you will have a complete understanding of how to use the CNC Shield V3 to bring your CNC machine, 3D printer, or laser cutter projects to life.
Let’s get started!
Required Components
- Arduino UNO
- CNC Shield V3
- Stepper Driver (A4988, DRV8825, or SilentStepStick)
- Stepper Motor
- USB A-Male to B-Male Cable
- 12V-36V Power Supply
CNC Shield V3: Features
The CNC Shield V3 is specifically designed to work with Arduino UNO or Mega. It simplifies the control of stepper motors using A4988 or DRV8825 drivers. With this shield, you can:
- Run stepper motors
- Use end-stop sensors
- Control fans and other modules
Setup and Connection Guide
- Connect CNC Shield V3 to Arduino
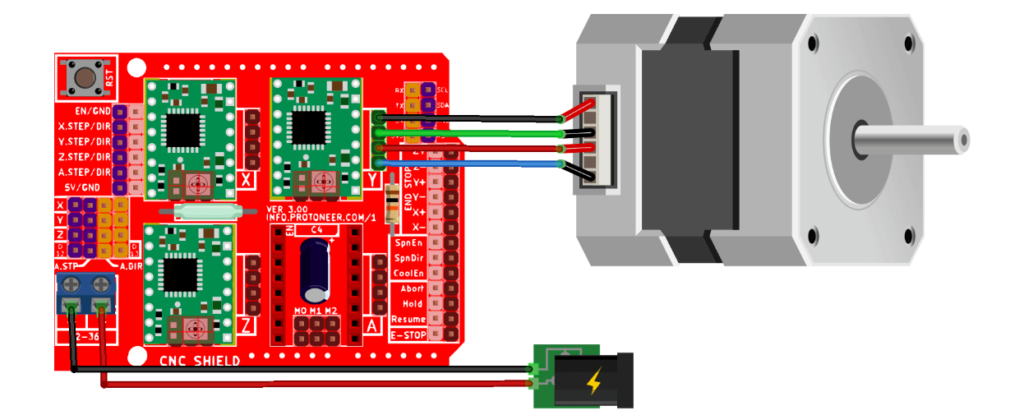
Mount the CNC Shield V3 directly onto the Arduino UNO pins. - Connect Stepper Drivers
Insert A4988 or DRV8825 drivers into the slots on the CNC Shield for each motor.Note: Ensure the correct polarity while placing the drivers. Incorrect placement can damage them. - Connect Stepper Motors
Connect the four wires of each motor to the X, Y, Z ports on the shield. - Power Supply Connection
Provide power (12V-36V) to the input terminal of the CNC Shield V3.
Code: Controlling Stepper Motors
Use the following code to control the stepper motor:
const int enPin = 8;
const int stepXPin = 2; // X.STEP
const int dirXPin = 5;  // X.DIR

const int stepsPerRev = 200; // Steps per revolution
int pulseWidthMicros = 100;  // Pulse width in microseconds
int millisBtwnSteps = 1000;

void setup() {
  pinMode(enPin, OUTPUT);
  digitalWrite(enPin, LOW);
  pinMode(stepXPin, OUTPUT);
  pinMode(dirXPin, OUTPUT);
  Serial.begin(9600);
  Serial.println("CNC Shield Initialized");
}

void loop() {
  // Run Clockwise
  Serial.println("Running clockwise");
  digitalWrite(dirXPin, HIGH);
  for (int i = 0; i < stepsPerRev; i++) {
    digitalWrite(stepXPin, HIGH);
    delayMicroseconds(pulseWidthMicros);
    digitalWrite(stepXPin, LOW);
    delayMicroseconds(millisBtwnSteps);
  }
  delay(1000);

  // Run Counter-clockwise
  Serial.println("Running counter-clockwise");
  digitalWrite(dirXPin, LOW);
  for (int i = 0; i < stepsPerRev; i++) {
    digitalWrite(stepXPin, HIGH);
    delayMicroseconds(pulseWidthMicros);
    digitalWrite(stepXPin, LOW);
    delayMicroseconds(millisBtwnSteps);
  }
  delay(1000);
}
Code Explanation
- Pin Declaration:
enPin,stepXPin, anddirXPinare declared to control the stepper motor driver. - Direction Control:
digitalWrite(dirXPin, HIGH)rotates the motor clockwise, whileLOWrotates it counter-clockwise. - Steps per Revolution:
stepsPerRevsets the number of steps required for one full revolution.
Output
After uploading the code:
- The motor will first rotate clockwise.
- Then it will rotate counter-clockwise.
Precautions
- Set Current Limit: Before connecting the drivers, set the current limit appropriately.
- Correct Driver Placement: Incorrect placement can damage the drivers.
Applications
- CNC Machine Development
- 3D Printer Design
- Laser Cutting Projects
- Stepper Motor Control for any project
By following this guide, you can easily start your projects using the CNC Shield V3 with Arduino.


Thanks for a marvelous posting! I really enjoyed reading it, you can be a great author.
I will ensure that I bookmark your blog and will often come back
in the future. I want too encourage you to ultimately continue your great work, have a
nice evening! http://Boyarka-Inform.com/
Hi, Neat post. There is an issue together with your site in web explorer, may test this?
IE still is the marketplace leader and a large component of people will omit your
magnificent writing due to this problem.
In the code “pulseWidthMicros” is set to 100 uS but this may be too fast for a given motor. Nothing happened with my test motor until I change this value to 1000 uS. Might help someone else to get the code working.
hey there and thank you for your information – I’ve certainly picked up something new from right here. I did however expertise some technical issues using this site, as I experienced to reload the web site many times previous to I could get it to load correctly. I had been wondering if your hosting is OK? Not that I’m complaining, but slow loading instances times will sometimes affect your placement in google and can damage your high quality score if advertising and marketing with Adwords. Anyway I’m adding this RSS to my e-mail and could look out for much more of your respective exciting content. Ensure that you update this again soon..